Taking on a new hardware project can feel like a big commitment, particularly when it involves cutting into a metal door frame. An electric strike is a fantastic security upgrade, but it’s a more complex job than simply changing a lock. You might be wondering if it’s a project you can handle yourself or if it’s time to call a professional. This guide is designed to give you a clear, honest look at the entire process. We’ll cover the tools, techniques, and safety checks involved. By the end, you’ll have a complete understanding of how to install electric strike in metal door frames, helping you make an informed decision and tackle the project with confidence.
Key Takeaways
- Choose the Right Strike and Measure Twice: Before you begin, confirm whether you need a fail-safe or fail-secure model for your door’s purpose and carefully mark its placement on the frame to ensure a perfect fit.
- Prioritize Latch Alignment: The most critical part of the installation is making sure the door latch slides smoothly into the strike without force, as this prevents damage and ensures the lock works reliably.
- Perform Routine Checks and Know Your Limits: Keep your system functional by regularly cleaning debris from the strike opening, but call a professional for complex issues like buzzing sounds or inconsistent locking to protect your security.
What Is an Electric Strike and How Does It Work?
If you’re looking to upgrade your property’s security beyond a traditional lock and key, an electric strike is a fantastic option. Think of it as a modern, electrified version of the metal plate in your doorframe that the latch goes into. Instead of being a simple, static piece of hardware, an electric strike uses a small amount of power to control the locking mechanism. When it receives an electrical signal—from a keypad, a card reader, or a button at a reception desk—a small, hinged piece of metal called the keeper moves out of the way. This allows the door to open without you having to turn a key or even retract the latch.
This technology is a core part of many modern security systems, especially in commercial buildings, but it’s becoming more common in residential settings, too. It gives you remote control over who enters a space, making it perfect for apartment buildings, offices, and secure rooms. The system is wired into your building’s low-voltage electrical system and can be configured in a couple of different ways depending on your security needs. It’s a simple yet effective way to manage access and add a layer of convenience and control to your property.
Key Components of an Electric Strike
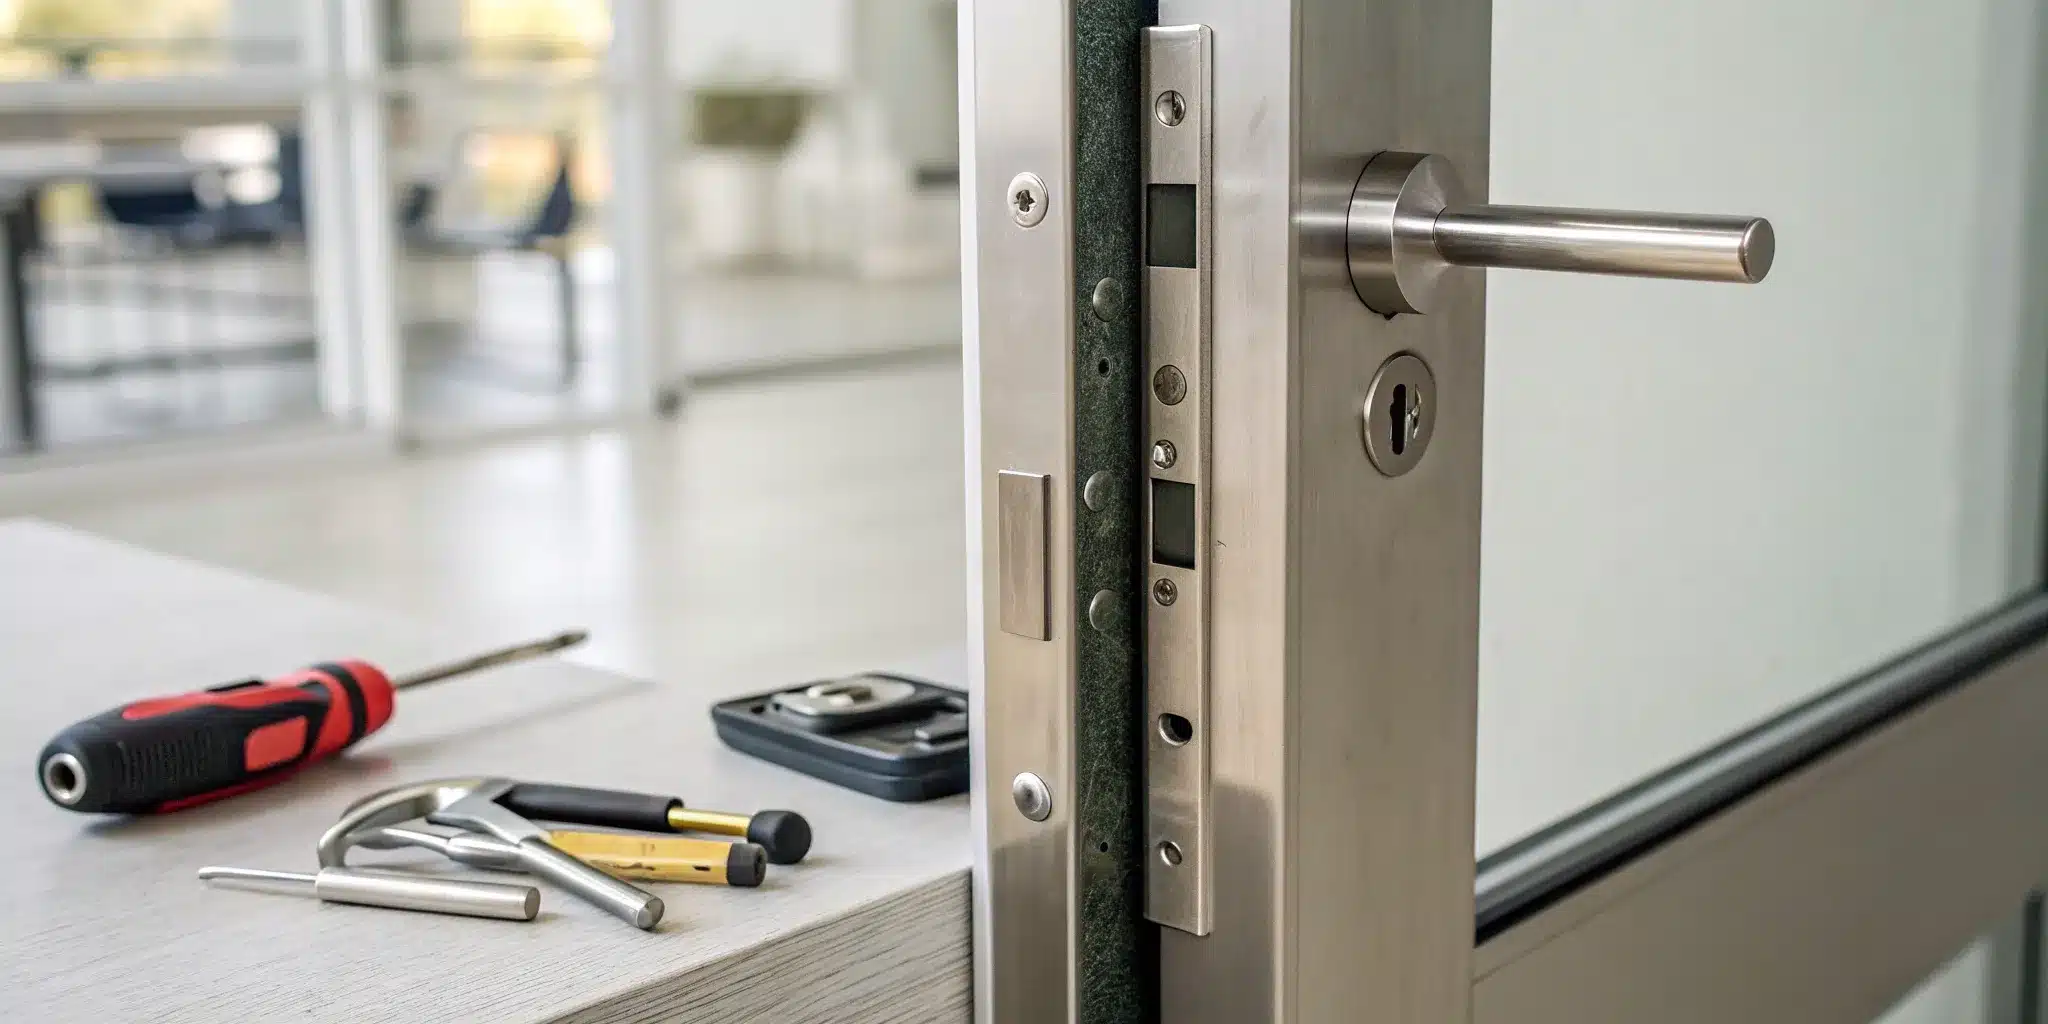
At its heart, an electric strike consists of the main body, which houses the electrical components, and a movable keeper. The keeper is the part that pivots to release the door’s latch. Inside the body, you’ll find a solenoid or motor that activates the keeper when it receives an electrical pulse. These components are designed to fit neatly into the doorframe where your old strike plate used to be.
The design of an electric strike can vary quite a bit to fit different types of doors and frames, whether they’re made of wood, hollow metal, or aluminum. It’s a pivotal piece in an access control circuit, working alongside other devices like keypads, card readers, or even biometric scanners. These devices send the signal that tells the strike when to open, creating a complete system for managing entry to your commercial property.
Why Install an Electric Strike on Your Property?
Installing an electric strike offers a major step up in both convenience and security. For businesses, it allows you to “buzz in” visitors from a reception desk without having to walk to the door. For apartment buildings, it lets residents grant access to guests through an intercom system. This controlled access means you always know who is coming and going, which is a huge peace of mind.
A critical feature to consider is whether the strike is “fail-safe” or “fail-secure.” A fail-secure strike remains locked during a power outage, keeping the area secure. A fail-safe strike unlocks when the power goes out, which is essential for fire safety on exit doors. This ensures people can always get out in an emergency, making it a vital consideration for any emergency locksmith plan.
Choosing the Right Strike for Your Metal Door
Picking the right electric strike isn’t a one-size-fits-all situation, especially for metal doors. The first thing to confirm is that the strike is compatible with your door and frame material. Strikes are specifically designed for different materials like hollow metal, aluminum, or wood, and using the wrong one can lead to a poor fit and compromised security. You also need to match the strike to the type of lockset on your door, whether it’s cylindrical, mortise, or rim exit.
Beyond compatibility, you have to decide between a fail-safe and fail-secure model. This choice depends entirely on the door’s purpose. For an office server room, fail-secure is ideal to keep it protected during a power failure. For a main exit, local fire codes will likely require a fail-safe strike. Getting this right is crucial for both security and compliance, so it’s always a good idea to consult with a professional about your door installation needs.
What Tools and Materials Do You Need?
Before you make the first cut, let’s get your workspace in order. A successful installation is all about preparation, and having the right tools and materials on hand will make the entire process smoother and safer. Think of it as setting up your ingredients before you start cooking—it prevents scrambling later on. Taking a few minutes to gather everything you need ensures you can work efficiently and avoid any mid-project hardware store runs. This list covers the essentials for installing an electric strike in a standard metal door frame.
Your Toolkit for Cutting and Drilling
To get a clean, precise fit for your new electric strike, you’ll need a few key tools. These items will help you measure accurately, cut through the metal frame, and secure the hardware properly. You likely have some of these in your toolbox already.
Your core toolkit should include:
- A reliable drill: This is essential for creating holes for wiring and mounting screws.
- A hacksaw: You’ll need this for making clean cuts in the metal door frame to fit the new strike body.
- A screwdriver set: Have both Phillips and flat-head screwdrivers ready for removing the old strike plate and installing the new one.
- A tape measure: Accuracy is everything. Measure twice (or even three times!) to ensure your markings are perfect before you start drilling or cutting.
Necessary Materials and Hardware
Beyond your basic toolkit, you’ll need some specific hardware to create the perfect mortise—that’s the recess in the frame where the strike sits. Using the right bits and chisels prevents you from damaging the door frame and ensures a snug, secure fit for the lock.
Make sure you have these materials:
- Chisels (1-inch and 3/4-inch): These will help you clean up the opening after you’ve made your initial cuts.
- Drill bits (7/8-inch spade bit and 3/32-inch bit): The spade bit is for creating the main recess, while the smaller bit is for pilot holes for your mounting screws.
Properly cutting out a door plate is crucial for a professional-looking finish that functions correctly.
Safety First: Essential Gear and Precautions
Now for the most important part: safety. Any time you’re working with power tools and electrical wiring, you need to take precautions. Always wear safety glasses to protect your eyes from metal shavings.
It’s also critical to think about how the lock will function in an emergency. If the electric strike is on a primary exit, you must ensure it can be operated during a power outage. Some models are “fail-secure” (stay locked without power) while others are “fail-safe” (unlock without power). For most businesses and residential buildings, a fail-safe mechanism or a manual override is required for fire safety. If you have any doubts about compliance or wiring, our experts in security systems can ensure your installation is both secure and safe.
How to Prep the Metal Door and Frame
Getting your door and frame ready is the most important part of the installation. Think of it as creating the perfect foundation—a little extra care here ensures everything fits and functions smoothly. Taking your time with these prep steps will save you from headaches and lead to a clean, professional-looking result.
Measure and Mark the Strike’s Location
Precision is key. Start by reading the installation instructions that came with your electric strike. You’ll need to position the centerline of the new strike so it aligns perfectly with the centerline of your door’s lockset. Once you’ve found the sweet spot, hold the new strike plate against the frame and trace its outline with a fine-tip marker. Double-check your measurements before you move on—it’s much easier to adjust a pencil line than a hole cut in a metal frame.
Remove the Old Strike Plate
With your new strike’s location marked, it’s time to remove the old one. Use a screwdriver to remove the screws holding the existing strike plate in place. If you’re working with a brand-new door, you can skip this step. Once the plate is off, clean the area inside the frame for a clean surface. If you notice any damage to the frame during this process, it’s best to get a professional door repair before proceeding.
Cut the Mortise in the Frame
The cutout you make for the strike plate is called a mortise. For a metal frame, you’ll need more power than you would with wood. Start by drilling pilot holes at the corners of your traced outline. Then, using a tool like a Dremel or a jigsaw with a metal-cutting blade, carefully cut along the lines. The key is to go slow. Cut just inside your traced lines, then use a metal file to smooth the edges and expand the opening until the electric strike body fits snugly inside.
Plan the Wiring Path
Your electric strike needs power, so you have to run wires from the strike to a power supply. You’ll also need to connect it to your access control system, like a keypad or card reader. Before drilling, map out the cleanest and most concealed path for the wiring. This often means running the wires through the wall near a power source. For a surface-mounted solution, you can use a wire molding to hide the cables. Planning this path carefully ensures a secure and tidy installation.
Your Step-by-Step Installation Guide
With the frame prepped and ready, you’re at the most exciting part: installing the hardware. This stage is all about precision. Taking your time here will save you from headaches later. Follow these steps carefully to ensure your electric strike is secure, powered, and perfectly aligned.
Install the Electric Strike Body
First, gently slide the body of the electric strike into the mortise you cut into the door frame. It should be a snug fit, but you shouldn’t have to force it. Before you secure it with screws, double-check that it’s flush with the surface of the frame. Remember, electric strikes are designed to work with specific door and frame materials, so confirming you have the right model for your metal frame is a critical first step. Once you’re happy with the placement, use the provided screws to fasten the strike body securely into the frame. Don’t overtighten them just yet—you might need to make small adjustments later.
Run and Connect the Wires
Now it’s time to bring your lock to life. Carefully feed the wires from the electric strike through the path you planned, whether it’s through the wall or along the frame. This is the most delicate part of the installation. You’ll need to connect the strike to both a dedicated power supply and your building’s access control system. Most basic electric strikes aren’t wireless for security reasons, so a hardwired connection is essential. If you’re integrating this into a larger network of security systems, ensuring the wiring is correct is crucial for the whole system to function properly.
Secure the New Strike Plate
With the strike body in place and the wires connected, you can now attach the faceplate. This is the piece of metal that covers the internal mechanism and provides a clean, finished look. Place it over the strike body and align the screw holes. The most important part of this step is ensuring the centerline of the electric strike aligns perfectly with the centerline of your door’s lockset. According to manufacturers, this alignment is what ensures optimal performance. Once you’ve confirmed the alignment, tighten all the screws so the entire unit is secure and doesn’t wiggle.
Test the Door Latch Alignment
The final step before you pack up your tools is to test your work. Close the door slowly and check the alignment of the latch with the new electric strike. The lock should slide easily into the strike hole without any sticking, grinding, or forcing. Open and close the door several times to make sure it operates smoothly every time. If you feel any resistance, the alignment might be slightly off. You may need to loosen the screws and make minor adjustments. If you’ve made adjustments and it’s still not right, it might be time to call in a professional commercial locksmith to get it perfect.
How to Test and Troubleshoot Your New Electric Strike
You’ve installed your new electric strike, and now it’s time for the final check. Properly testing your lock ensures it’s secure, works smoothly, and meets important safety standards. These quick steps will help you confirm that everything from the power to the alignment is correct, giving you peace of mind in your new security upgrade. If you hit a snag, don’t worry—most common issues are simple to fix.
Check for Power and Proper Function
First, confirm the strike is getting power. After connecting the wires and turning on the power, listen for a distinct “click” or “buzz” when you activate the strike. This sound means the internal mechanism is working. If it’s silent, start by checking that all wiring connections are tight. Then, use a multimeter to ensure the strike is receiving the correct voltage specified by the manufacturer. An incorrect voltage can cause it to fail or even damage the unit. If the problem persists, the issue may lie with the power source or the larger security system it’s integrated with.
Test the Alignment and Latch Force
Proper alignment is crucial for smooth operation. With the power off, close the door to see if the latch slides easily into the strike’s keeper without force. The door should close securely without rattling. If the latch binds or hits the strike plate, you’ll need to make adjustments, like slightly repositioning the strike or filing the opening for a better fit. A misaligned strike creates friction, puts strain on the lock, and can lead to early failure. If you suspect the frame itself is the problem, you might need professional door repair.
Solving Common Installation Problems
Even with a careful install, you might run into a few issues. A constant buzzing often points to a power mismatch, like using an AC power supply for a DC-rated strike. If the door won’t unlock when activated, double-check your power and wiring. If it fails to lock when the power is off, you may have the wrong strike type (fail-safe instead of fail-secure) or an alignment problem. Check the mortise for any debris that could be blocking the latch. If you’re stuck and need a hand, our emergency locksmiths are available 24/7 to help you out.
Verify Fire Safety Compliance
In many buildings, especially commercial ones, fire safety is a top priority. If your electric strike is on a fire-rated door, it must be a “fail-secure” model. This ensures the door remains locked and latched if power is lost, which helps contain fire and smoke. A “fail-safe” strike, which unlocks without power, should not be used on fire doors. It’s also vital that primary exits allow for safe egress during a power outage. Always check that your installation complies with local building codes. Our commercial locksmith team can help ensure your property meets all safety standards.
How to Maintain Your Electric Strike
Once your electric strike is installed, the job isn’t quite done. Just like any other piece of security hardware, it needs a little attention to keep it working smoothly for years to come. Proper maintenance ensures your door remains secure and accessible, preventing frustrating malfunctions when you least expect them. Think of it as a quick health check-up for your door’s security system.
The good news is that maintaining an electric strike is straightforward. By setting up a simple inspection routine, planning for power outages, and knowing when to call for backup, you can ensure your system remains reliable. These simple steps will protect your investment and give you peace of mind, whether you’re securing your home or your business. A well-maintained electric strike is a key part of a dependable security system, and taking care of it is easier than you think.
Set Up a Regular Inspection and Cleaning Routine
A little proactive care goes a long way. Set aside a few minutes each month to inspect your electric strike. First, listen for the distinct “click” when you activate it—this sound confirms the mechanism is engaging. Next, check the strike opening for any dirt, dust, or debris that could jam the latch. A quick blast of compressed air or a gentle sweep with a soft brush is usually all it takes to clear it out.
You should also give the door a gentle push when it’s locked to make sure the strike is holding firm. Visually inspect any exposed wiring for signs of fraying or damage. Catching these small issues early can prevent a major headache down the road and keep your entry point secure.
Plan for Power Supply and Backups
Your electric strike needs power to function, so what happens when the lights go out? If the strike is on a primary entrance or an emergency exit, you must have a backup plan. For fail-safe locks, which unlock when power is lost, this is a security consideration. For fail-secure locks, which remain locked without power, it’s an access issue.
The best solution is to connect your system to an uninterruptible power supply (UPS) or a dedicated battery backup. This ensures the lock remains operational during a power outage, so you aren’t left locked in or out. Planning for power interruptions is a critical step, especially in a city like New York, and can prevent a simple outage from turning into an emergency lockout situation.
When to Call the Pros at Golden Key Locksmith NYC
While basic cleaning and inspection are great DIY tasks, some issues require an expert touch. If your electric strike is buzzing, failing to engage consistently, or if the door isn’t latching correctly, it’s time to call a professional. These symptoms can point to complex electrical problems or alignment issues that can compromise your security if not addressed properly.
Modern access control systems can be intricate, and proper installation and maintenance are crucial for functionality, especially in commercial settings with hollow metal doors. If you’re experiencing any problems you can’t solve or simply want a professional to perform a thorough system check-up, our team at Golden Key Locksmith NYC is here to help. We have the tools and expertise to diagnose and fix any issue, ensuring your property remains secure.
Related Articles
- Key Duplication: What You Need To Know (Guide)
- Mul-T-Lock Vs. Medeco: A Locksmith’s Comparison
- Locksmith Services
Frequently Asked Questions
What’s the difference between “fail-safe” and “fail-secure” again? Think of it this way: “fail-secure” prioritizes security, while “fail-safe” prioritizes safety. A fail-secure strike stays locked when the power goes out, which is perfect for a room you need to keep protected at all times, like a server room. A fail-safe strike unlocks when the power cuts off, which is essential for exit doors so people can always get out during an emergency like a fire.
Can I still use my regular key with an electric strike? Yes, you absolutely can. The electric strike replaces the stationary metal plate in your door frame, not the lock in your door. It simply adds a remote way to release the latch. You can still use your key to turn the lock and retract the latch just as you always have, giving you two ways to open the door.
Is this a realistic DIY project for a beginner? If you’re comfortable with power tools, precise measurements, and basic low-voltage wiring, you can certainly tackle this project. However, it requires a lot of precision, especially when cutting into a metal door frame. If you’re at all hesitant, calling a professional is the best way to ensure your door is secure, aligned correctly, and wired safely.
My electric strike is making a constant buzzing sound. What does that mean? A continuous buzzing noise is almost always a sign of a power mismatch. It typically means the strike is receiving the wrong type of electrical current, like AC power when it was designed for DC power. This can damage the unit over time, so it’s important to check your power supply and the strike’s specifications to make sure they match.
Can I use these instructions to install an electric strike on a wooden door frame? While the general steps are similar, the tools and techniques for cutting into wood are different from metal. For a wooden frame, you would use sharp chisels to create the mortise instead of a hacksaw or jigsaw. The principles of alignment and wiring remain the same, but you should always adapt your approach to the material you’re working with.
How to Properly Install Electric Strike for Optimal Performance
Need professional help in NYC? Contact Golden Key Locksmith NYC for Key Card Entry Systems or Access Control Systems. Available 24/7 across Manhattan and all NYC boroughs.