Ever pushed open a massive, heavy-looking door and been surprised by how it glides with almost no effort? You’ve likely just used a balanced door. These aren’t your typical hinged doors; they operate on a clever pivot system that makes them feel practically weightless. This unique design is a game-changer for high-traffic commercial buildings, offering both an elegant look and easy access. But the magic is all in the setup. A flawless balanced door hardware installation is what creates that smooth, satisfying swing. This guide will walk you through the entire process, from preparing your doorway to making those final, crucial adjustments.
Key Takeaways
- Proper Prep Work is Non-Negotiable: Before you begin, ensure your door frame is perfectly square and level, and gather all your tools and hardware. A little time spent here prevents major installation headaches and ensures a professional result.
- The Pivot Points Define the Door’s Function: The effortless, balanced swing comes from the precise placement of the top and bottom pivots. Even a minor misalignment can cause the door to stick or sag, so focus on getting this step exactly right.
- Final Adjustments and Knowing Your Limits are Key: After installation, always test the door’s movement and fine-tune the hardware for a perfect seal and smooth operation. If you encounter structural issues or feel uncertain, calling a professional is the smartest way to protect your investment.
What is a Balanced Door and How Does It Work?
Ever walked up to a grand, heavy-looking entrance and been surprised by how effortlessly the door swings open? You’ve likely encountered a balanced door. These doors are engineered to handle the constant flow of people in busy buildings. Unlike a standard hinged door that swings from the frame, a balanced door pivots from a point inset from the heel edge. This unique design is a go-to for smooth, effortless operation, as it significantly reduces the force needed to open and close the door.
This clever engineering is especially useful for large, heavy doors made of materials like bronze, steel, or thick glass. The mechanism distributes the door’s weight, so it feels light and manageable to anyone passing through. It’s a smart solution that combines impressive aesthetics with practical accessibility, making it a favorite for high-traffic commercial and public spaces. If you’re considering a new entrance for your business, a balanced door installation can offer both style and function.
The Pivoting Mechanism Explained
The magic behind a balanced door lies in its unique pivot system. Instead of hinges mounted on the side of the frame, the door rotates on a pivot point set in from the edge. This design creates a fulcrum that allows for a balanced operation, minimizing the effort required to move the door. As you push it open, a portion of the door swings inward while the rest swings outward. This action effectively neutralizes external forces like wind and internal building stack pressure, which can make traditional doors difficult to operate. It’s this intelligent weight distribution that makes even the most imposing doors feel surprisingly light.
Advantages Over Traditional Doors
The most significant benefit of balanced doors is how easy they are to open, regardless of their size or weight. This feature is crucial for ensuring accessibility. In fact, these doors often meet all ADA (Americans with Disabilities Act) requirements without needing expensive automatic openers, making them a cost-effective choice for public-facing businesses. They also perform exceptionally well in buildings with significant air pressure differences, like high-rises, preventing doors from being slammed shut or blown open. This makes them a reliable and safe option for any commercial property.
Common Places You’ll Find Balanced Doors
You’ll spot balanced doors at the entrances of buildings that need to manage a steady stream of foot traffic while maintaining a polished look. Think about the grand entrances to museums, luxury retail stores, corporate headquarters, hotels, and university buildings. Because they combine elegant design with reliable performance, balanced doors are an excellent choice for public, commercial, and other large-scale buildings. Their ability to handle heavy use without sacrificing ease of access makes them a practical and sophisticated solution for any main entrance.
Gather Your Tools and Materials for Installation
Before you start any project, it’s smart to get all your ducks in a row. Think of it like cooking a new recipe—you wouldn’t start without having all the ingredients measured and ready on the counter. A smooth installation begins with having every tool and part you need within arm’s reach. This simple prep work prevents those frustrating mid-project runs to the hardware store and ensures you can focus on getting the job done right. Taking a few minutes to organize your workspace and toolkit will save you time and a potential headache later on. Let’s walk through exactly what you’ll need to have on hand.
Your Essential Toolkit
You don’t need a professional workshop, but a few key tools are non-negotiable for this installation. First, you’ll want a good drill with a set of drill bits for creating new holes for the hardware. A chisel will also be essential, especially if you need to adjust the recess for the strike plate to ensure a flush fit. Having these basics ready will help you handle the most common adjustments you’ll need to make. If you’re looking to build out your collection, This Old House has a great guide on how to upgrade front door hardware that covers the essential tools for most door projects.
The Right Hardware Components
Unpack your balanced door hardware kit and lay everything out. While the exact components will vary by manufacturer, you should see a collection of pivot arms, securing screws, bearings, and washers. Your kit will include a detailed manual and parts list—treat it as your guide. Double-check that you have every piece, from the closer arm roller assembly to the smallest set screw. These components are engineered to work together to create that smooth, effortless swing. If anything is missing or you’re unsure about a part, it’s best to contact the manufacturer before you begin the installation.
Supplies for Measuring and Marking
Precision is everything when it comes to installing a door. Even a tiny error in measurement can cause the door to stick, swing unevenly, or not close properly. That’s why your most important supplies are a reliable measuring tape and a sharp pencil or marker. Take your time measuring the door dimensions and marking exactly where you’ll drill holes and place the hardware. As the old saying goes, “measure twice, cut once.” Getting your markings perfect from the start is one of the best ways to avoid common door installation mistakes and ensure a flawless result.
Prepare Your Doorway for Installation
Before you even think about touching the hardware, let’s talk about the most critical part of the process: prepping your doorway. I know it’s tempting to jump straight to the main event, but getting the foundation right is what separates a smooth, perfectly swinging door from one that sticks, squeaks, and causes headaches down the line. Taking a little extra time here ensures your new balanced door will function flawlessly for years.
Think of it as setting the stage. A perfectly prepared doorway makes the entire installation smoother and helps you avoid common frustrations. We’ll walk through three key steps: measuring the frame, checking its alignment, and making sure everything is up to code. Getting these details right will not only make the job easier but will also guarantee a professional-quality result. Whether you’re a seasoned DIYer or just starting, these prep steps are your recipe for success.
Measure Your Door Frame
You’ve probably heard the old saying, “measure twice, cut once.” When it comes to door installation, I’d say measure three or four times just to be safe. Grab a reliable tape measure and check the width of the door frame at the top, middle, and bottom. Then, do the same for the height on both the left and right sides. Frames can settle and shift over time, so you might be surprised to find slight variations. Also, consider any recent or future changes. Are you planning to install thicker flooring or add new weatherstripping? These additions can alter the final dimensions you need, so be sure to account for them in your measurements to ensure a perfect fit.
Check for Proper Alignment and Level
A perfectly balanced door needs a perfectly aligned frame. Use a spirit level to check that the frame is plumb (perfectly vertical) and level (perfectly horizontal). If the frame is even slightly off, your door might swing open on its own, stick when you try to close it, or put unnecessary strain on the pivot hardware. You should also check that the corners are square, meaning they form a perfect 90-degree angle. If you find that your frame is warped or out of alignment, it’s best to address that first. Sometimes, a frame needs a bit of work, and our team can help with professional door repair and installation to get it ready.
Review Local Building Codes and ADA Rules
This step is especially important for businesses, but it’s a smart move for everyone. Before you begin, take a moment to look up the local building codes in your NYC borough. Following these regulations is essential for ensuring your installation is safe, secure, and legal, which helps you avoid potential fines later on. For commercial properties, you’ll also need to consider the Americans with Disabilities Act (ADA) guidelines to ensure your entrance is accessible to everyone. Balanced doors are an excellent choice for this, as their design makes them easy to open. If you’re a business owner, our commercial locksmith services can help you ensure your entire entryway meets all necessary compliance standards.
How to Install Balanced Door Hardware, Step by Step
Installing balanced door hardware is a precise job that requires careful attention to detail. Unlike a standard hinged door, a balanced door pivots on two points, creating a unique swing path that makes even the heaviest doors feel light and easy to open. This process involves several key stages, from setting the pivots correctly to fine-tuning the weight distribution. While it’s a fascinating mechanical process, it’s also one where small mistakes can lead to big problems. For commercial properties or complex residential setups, working with a professional door installation service ensures everything is done correctly and up to code. Ready to see how it works? Let’s walk through the process.
Step 1: Install the Top Pivot Assembly
The first move is to install the top pivot assembly, which acts as the upper anchor for the door’s swing. This piece of hardware typically includes a shaft and a spline pin. You’ll need to carefully push up the pin screw inside the shaft slot and adjust the shaft until the pin clicks securely into the spline hole in the unit above it. Getting this alignment perfect is non-negotiable. The top pivot carries a significant portion of the door’s weight and guides its movement, so a secure fit here ensures the door will operate smoothly and without any wobble or friction.
Step 2: Mount the Bottom Pivot Point
Next, you’ll secure the bottom pivot point to the floor or threshold. This component is the foundation of the entire system, providing the lower axis on which the door will turn. It’s essential that this pivot is mounted solidly into a stable surface. Any looseness or instability here will compromise the door’s balance and could cause it to sag or bind over time. A properly mounted bottom pivot is crucial for the door’s long-term functionality and durability, ensuring it can withstand constant use without failing. Take your time to get this part right—it pays off in the end.
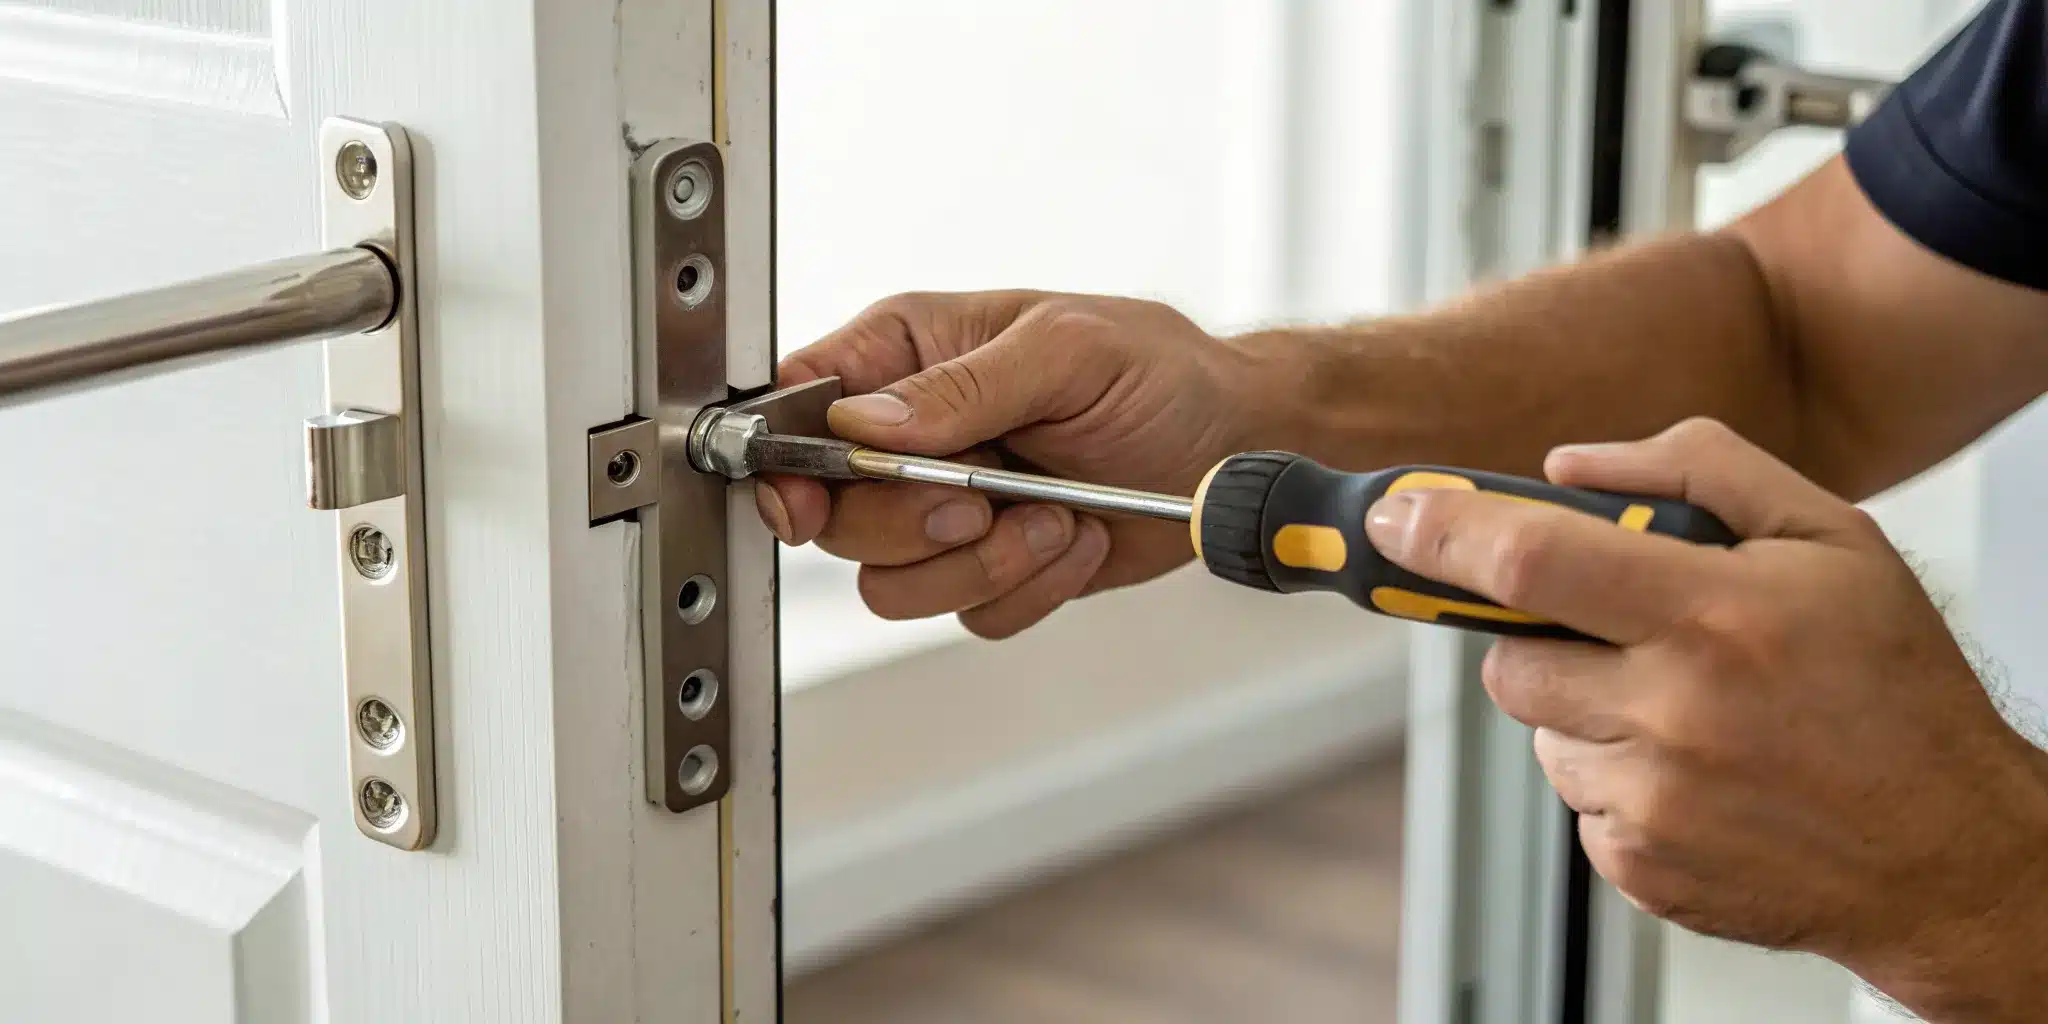
Step 3: Attach the Hardware to the Door
With the pivots in place, it’s time to attach the corresponding hardware directly to the door panel. This usually involves carefully marking the correct positions and, if necessary, using a drill to create new holes for the mounting screws. Precision is key here; you want to ensure the hardware is perfectly aligned and securely fastened without damaging the door itself. When you attach the hardware, you’re creating the connection points that allow the door to interact with the pivots. A firm, accurate attachment is vital for the door’s stability and effortless operation.
Step 4: Set the Weight Distribution and Balance
This is where the magic of a balanced door really comes into play. These doors are engineered to handle heavy, daily use, and their unique design allows you to adjust the weight distribution for an incredibly smooth swing. By fine-tuning the hardware, you can ensure the door feels almost weightless as it opens and closes. This step involves making small adjustments to the pivot mechanisms until the door hangs perfectly and moves without resistance. Understanding the benefits of balanced doors helps clarify why getting this step just right is so important for the user experience.
Step 5: Add Panic Hardware (If Applicable)
For many commercial buildings, panic hardware is a safety requirement for exit doors. If your installation calls for it, you can’t just use any standard panic bar. Balanced doors require a specific ‘push-pad’ style of hardware that is compatible with their unique swing path. A traditional crossbar would interfere with the door’s movement as it pivots inward. Installing the correct panic hardware is essential not only for functionality but also for meeting building codes and ensuring the safety of everyone who uses the door in an emergency.
Step 6: Perform Final Alignment and Testing
Once everything is installed, the final step is to check your work. Use a level to ensure the door is perfectly plumb (straight up and down) and square within its frame. A proper final alignment prevents issues like sticking, drafts, and uneven wear on the hardware. Open and close the door several times to test its operation. It should swing smoothly, close securely, and feel effortless to move. This final check confirms that the installation was successful and that your new balanced door is ready for years of reliable service.
Common Installation Mistakes to Avoid
Installing a balanced door requires precision, and even a small mistake can lead to big problems down the road. A door that doesn’t close properly, gets stuck, or feels flimsy is often the result of a simple installation error. Taking your time and paying close attention to detail can save you from future headaches and costly repairs. Let’s walk through some of the most common pitfalls so you can steer clear of them and get your installation right the first time.
Inaccurate Measurements and Misalignment
One of the most frequent issues is starting with incorrect measurements. Before you begin, prepare the door opening by making sure it is perfectly level, square, and plumb. A crooked frame prevents the door from hanging correctly, leading to gaps, drafts, and difficulty opening or closing. If your existing frame is warped or damaged, you may need professional door repair and installation to correct it first. Taking the time to double-check your measurements and ensure the frame is perfectly aligned is a critical first step.
Incorrect Weight Distribution
Balanced doors operate smoothly based on a precise distribution of weight through their pivot points. Many door problems start with an improperly installed frame that can’t support the door’s weight correctly. If the frame isn’t secure, the door will sag over time, putting stress on the pivots and hinges. This can cause the door to drag on the floor, stick in the frame, and eventually damage the hardware. Ensuring the frame is solidly anchored and capable of handling the door’s weight is essential for long-term, effortless operation.
Using the Wrong Hardware
Choosing the right components is crucial for both security and functionality. Make sure the handles, locks, and pivots are designed for the specific weight and material of your balanced door. Using screws and fasteners that are too weak can be a serious safety hazard, as they may fail under the door’s weight. For businesses, this might mean choosing robust commercial locksmith grade components that can withstand heavy traffic and provide reliable security. Always prioritize durability and ease of use when selecting your hardware.
Skipping the Final Test
Once the door is in place, it’s tempting to call it a day, but skipping the final test is a mistake. After installation, you need to thoroughly check the door’s operation. Open and close it several times to ensure it moves smoothly without catching or sticking. Test the lock to make sure it engages correctly and that the door is secure when closed. Check the seals for any gaps that could let in drafts. Making these small adjustments right after installation ensures everything works perfectly and gives you peace of mind.
Stay Safe During Your Installation
Taking on a project like installing a balanced door is exciting, but it’s a job where safety can’t be an afterthought. You’re working with heavy materials and precise mechanisms, and a small misstep can lead to injury or a door that just doesn’t work right. Before you even pick up a tool, it’s essential to create a safe environment for yourself and anyone helping you. This isn’t about adding complicated steps to the process; it’s about setting yourself up for a smooth, successful installation from start to finish. A little preparation goes a long way in preventing accidents that could send you to the emergency room or force you to buy replacement parts.
We’ll walk through three fundamental safety practices: wearing the right protective gear, using proper lifting techniques, and keeping your work area clear. These steps protect you from injury and help prevent damage to your new door and hardware. Think of it as part of the project’s foundation—just as important as getting your measurements right. A safe installation is a successful one, and our team of professionals handles every door repair and installation with this principle in mind, ensuring every job is done correctly and safely.
Wear the Right Protective Gear
This might seem obvious, but it’s the easiest step to skip and one of the most important. Always wear safety glasses and gloves to protect yourself from potential injuries during the installation process. Safety glasses shield your eyes from sawdust, metal filings, and any other debris that can get kicked up while you’re drilling or setting hardware. A good pair of work gloves will protect your hands from splinters, sharp edges on the hardware, and accidental pinching. It’s also a good idea to wear sturdy, closed-toe shoes to protect your feet in case you drop a tool or a piece of hardware. It only takes a second to put on your gear, and it can save you from a painful, preventable injury.
Use Proper Lifting Techniques
Balanced doors, especially commercial-grade ones, can be surprisingly heavy and awkward to handle. It’s important to avoid mistakes during the lifting and handling of the door to ensure both your safety and the integrity of the installation. Always lift with your legs, not your back, to prevent serious strain. Keep your back straight and get a firm grip on the door before you move it. If the door feels too heavy or unwieldy, don’t try to be a hero—ask someone for help. Dropping a door can cause serious injury, and it can also damage the door itself, the frame, or the delicate pivot mechanisms, which could ruin your entire project.
Keep Your Workspace Clear and Safe
A cluttered workspace is a recipe for mistakes and accidents. Maintaining a clear workspace is crucial; even small mistakes during door installation can lead to significant problems. Before you begin, take a few minutes to clear the area of any tripping hazards like power cords, tools, and other materials. Make sure you have plenty of light to see what you’re doing, especially when you’re marking measurements and aligning hardware. A clean, organized space allows you to focus on the task at hand, move around freely, and place the door down safely when needed. This simple habit reduces the risk of tripping and helps ensure your installation is precise.
How to Test and Adjust Your New Door
Getting your balanced door hardware installed is a huge accomplishment, but the job isn’t quite finished. The final, and arguably most important, part of the process is testing and making those small adjustments that ensure your door works perfectly for years to come. A properly tuned door not only feels better to use but is also more secure and energy-efficient. Taking a few extra minutes to run through these checks will save you from headaches down the road and confirm that your door is ready for daily use. These final steps are what separate a good installation from a great one, ensuring everything from the lock to the seal is functioning exactly as it should. If you run into any issues you can’t resolve, our team is always ready to help with professional door repair and installation.
Check for Smooth Operation
Your first test is the simplest: just use the door. Open and close it several times, moving it through its full range of motion. Does it glide effortlessly, or do you feel resistance, sticking, or grinding? Listen for any unusual noises. According to the experts at Budget Garage Doors & Services, you should “check that locks, hinges, and seals work perfectly and make any small fixes needed.” The door should latch securely without you having to push or pull it into place. Also, test the lock mechanism. The bolt should extend and retract smoothly into the frame. If it feels stiff or misaligned, the door may need a slight adjustment to ensure your home or business is secure.
Fine-Tune the Pivot Points for Balance
Balanced doors are known for their effortless operation, which is all thanks to their unique hardware. As The Architect’s Newspaper notes, “With a unique pivoting design, the doors open with ease.” This is where fine-tuning comes in. The door should feel light and hold its position when partially opened, not swing shut or fly open on its own. If it feels heavy or moves erratically, you’ll need to adjust the pivot points. Most balanced door hardware has adjustment screws to control tension and alignment. Refer to your manufacturer’s instructions to make these small tweaks until the door feels perfectly balanced and moves with minimal effort.
Add Weatherproofing for a Perfect Seal
A proper seal is essential for keeping drafts and water out, which is especially important for exterior doors. Check for any visible gaps around the door frame when it’s closed. A tight seal prevents water damage and improves your building’s energy efficiency. To create a weatherproof barrier, you should “apply sealant around the door frame to stop water from getting in,” as one installation guide recommends. You can also add weatherstripping around the door’s perimeter and a door sweep at the bottom. These final touches ensure your new door not only looks great and functions smoothly but also protects your property from the elements.
Know When to Call a Professional
Taking on a DIY project like installing a balanced door is ambitious and rewarding. But even the most skilled DIY-er knows there are times when calling in a professional is the smartest move. It’s not about admitting defeat; it’s about protecting your investment, your property, and your peace of mind. A door that isn’t installed correctly can lead to bigger problems down the road, from constant maintenance headaches to serious security vulnerabilities.
Recognizing the line between a challenging project and a job that’s over your head is key. Professionals have the specialized tools, experience with tricky building structures, and in-depth knowledge to get the job done right the first time. This saves you from costly mistakes and ensures your door functions smoothly and securely for years. If you find yourself struggling with a complex installation or run into unexpected issues, stepping back and calling for expert help is the best next step.
Handling Complex Installations
Balanced doors are sophisticated systems, and their smooth operation depends on perfect installation. As one expert, Russ Hooker, notes, “Most door problems begin with improper installation of frames.” This is especially true for balanced doors, where the pivot mechanisms must be precisely placed and calibrated. A professional installer understands the physics behind the hardware and can ensure everything is perfectly aligned and balanced from the start.
They have the experience to handle the unique challenges that come with these systems, ensuring your door not only looks great but also meets all safety and accessibility standards. For a seamless and secure setup, consider a professional door repair and installation service to manage the complexities for you.
Signs You Need an Expert’s Help
Sometimes a project takes an unexpected turn. If you’ve started the installation and hit a snag, don’t force it. One of the clearest signs you need an expert is discovering unexpected structural issues within the door frame, like rot, warping, or a frame that isn’t square. Pushing through these problems can lead to bigger damage.
Another red flag is when the hardware just doesn’t seem to fit or operate as the instructions suggest. This could mean you have the wrong parts or that there’s a subtle alignment issue you can’t see. If you feel frustrated or uncertain, or if the project has left your property unsecured, it’s time to call for help. An emergency locksmith can quickly secure your door and finish the installation correctly.
Related Articles
- A Guide To Balanced Doors For Historic Buildings
- How To Vet The Best Panic Bar Installation Company
- Commercial Door Services
- Replacing a Mortise Lock Cylinder Step-by-Step
Frequently Asked Questions
Why should I consider a balanced door instead of a standard one? A balanced door is an excellent choice if you have a large, heavy entryway or if your building deals with high winds or air pressure differences. Because of its unique pivot system, it makes even the most massive doors feel light and easy to open. This makes it a great solution for high-traffic areas where you want to ensure accessibility for everyone without needing an expensive automatic opener.
Are balanced doors only for commercial buildings? While you most often see them at the entrances of places like hotels and museums, balanced doors can be a fantastic option for residential homes, too. If you’re planning a grand entrance with an oversized, custom door, the balanced mechanism ensures it will be easy for your family and guests to use every day. They offer a sleek, modern look that works well with contemporary architecture.
Is installing a balanced door a good DIY project? This is a project best left to those with significant experience. The installation requires extreme precision, as even a tiny error in measurement or alignment can cause the door to stick, swing unevenly, or fail to close properly. Given the complexity of the pivot hardware and the weight of the door, we generally recommend calling a professional to ensure it’s done safely and correctly the first time.
How much maintenance do balanced doors require? Balanced doors are built to be durable and withstand heavy use, so they don’t require a lot of day-to-day upkeep. However, it’s a good idea to periodically check that the door is swinging smoothly and that the pivot areas are clear of any dirt or debris that could interfere with the mechanism. A quick inspection a couple of times a year will help keep it functioning perfectly.
Are balanced doors as secure as traditional doors? Absolutely. The security of any door comes down to the quality of its lock, frame, and installation, not the way it swings. Balanced doors are incredibly sturdy and can be fitted with high-security locks and hardware, just like a standard hinged door. When installed correctly into a solid frame, they provide excellent security for any property.
Need professional help in NYC? Contact Golden Key Locksmith NYC for Metal Door Installation or Sliding Door Services. Available 24/7 across Manhattan and all NYC boroughs.