That feeling of getting the keys to a new apartment is fantastic, but it often comes with a nagging question: who else has a copy? Before you even unpack the first box, taking control of your home’s security should be a top priority. While replacing an entire lock seems like a big job, there’s a much simpler and more affordable solution.
Swapping out the mortise lock cylinder gives you a fresh set of keys and instant peace of mind. This guide will walk you through exactly how to change a mortise lock cylinder, covering the tools you’ll need, the simple steps to follow, and how to avoid common pitfalls.
Key Takeaways
- Match Before You Buy: To avoid a frustrating second trip to the hardware store, remove your old cylinder first. Measure its length and confirm the cam shape on the back to guarantee your new part will fit and function correctly.
- Proper Technique Prevents Problems: Use the key as a handle for better leverage when installing the new cylinder. Once it’s snug, back it off a half-turn before tightening the set screw to prevent the lock from binding.
- Know When to Call for Help: If the cylinder is stuck, the internal lock mechanism seems faulty, or you live in a building with a master key system, calling a professional is the smartest move to ensure your security isn’t compromised.
What Is a Mortise Lock Cylinder and Why Replace It?
A mortise lock is a classic, heavy-duty lock that sits inside a pocket—or mortise—cut into the edge of a door. You’ll often find them on apartment building entry doors and older homes because they are incredibly durable and secure. The heart of this lock is the mortise lock cylinder. This is the component where you insert your key, and it’s responsible for engaging or disengaging the bolt.
Think of it as the brain of the operation; without a functioning cylinder, the lock body is just a piece of metal.
So, why would you replace just the cylinder instead of the whole lock assembly? It’s a practical and cost-effective security move. If you lose your keys, move into a new apartment, or want to upgrade to a more secure key system, swapping out the cylinder is much simpler and more affordable than replacing the entire lock.
It gives you a fresh start with new keys, ensuring no old, stray copies can be used to open your door. For many residential and commercial properties, this is the go-to solution for maintaining security without a major overhaul. It allows you to quickly regain control over who has access, which is a top priority for any home or business owner.
The Key Parts of a Mortise Lock
Getting familiar with the basic anatomy of your mortise lock can make any maintenance or replacement project feel much less intimidating. While the internal workings are complex, there are just a few key external parts you should know. Understanding these components helps you identify what might need fixing or replacing and makes it easier to talk to a professional if you need help.
A mortise lock primarily consists of:
- Cylinder: This is the tumbler-filled housing where you insert the key. It contains the pins that must align correctly for the lock to turn.
- Forend Plate: This is the visible metal plate on the edge of the door that surrounds the latch and bolt. It holds the main lock mechanism securely within the door.
- Latch or Bolt Mechanism: This is the part that extends from the door into the frame, physically securing it. The cylinder controls its movement.
Signs It’s Time for a New Cylinder
A lock cylinder doesn’t usually fail overnight. It often gives you warning signs that it’s wearing out. Paying attention to these clues can help you address the problem before you find yourself in an emergency lockout situation. If you’re experiencing any of these issues, it’s a good idea to consider a replacement.
Here are a few clear indicators:
- Difficulty Turning the Key: If you have to jiggle your key or apply extra force to get the lock to turn, the internal pins are likely worn or misaligned.
- A Sticking Lock: When the lock feels sticky or catches as you turn the key, it’s a sign of internal wear and tear that can eventually lead to failure.
- Moving into a New Place: This is more of a security precaution than a sign of wear. When you move, you have no idea who might have a copy of the old key. Replacing the cylinder is a simple step for peace of mind and a common first DIY project for new homeowners.
Get Your Tools and Materials Ready
A little prep work goes a long way in making this project a success. Before you touch a single screw, gathering everything you need will save you from making extra trips to the hardware store and ensure the whole process goes smoothly. Let’s walk through exactly what you’ll need to have on hand to get the job done right.
Your Tool Checklist
You might be surprised by how simple the tool list is for this job. For most mortise lock cylinders, you’ll only need a couple of basic screwdrivers. Grab a Phillips head and a flathead screwdriver from your toolbox, and you should be set. Some lock models have unique hardware that might require an extra tool, but these two are the non-negotiables. Having them ready before you start means you won’t be scrambling to find the right tool mid-replacement.
Choose the Right Replacement Cylinder
This is the most important step in your prep work. Your new cylinder must be compatible with your existing lock hardware. The key is to match the “cam,” which is the small piece on the back of the cylinder that engages the lock mechanism. If the cam shapes don’t match, the lock won’t work.
The easiest way to get this right is to remove your old cylinder first, snap a quick picture of the back, and bring it with you when you buy the replacement. This simple step ensures you get a perfect match and maintain your home’s security.
Measure Your Current Cylinder
An accurate measurement is essential for a seamless fit. Using a tape measure, check the length of your old cylinder from the front plate to the very back. Most residential mortise cylinders are a standard size, typically 64mm (about 2.5 inches) or 76mm (3 inches). Your new cylinder needs to match this measurement exactly.
If the new lock body is too big for the existing hole in your door, you might have to enlarge the door opening slightly, which can make a simple job more complex. Double-checking your measurements now prevents a major headache later.
Removing the Old Cylinder
With your tools ready and your new cylinder on standby, it’s time for the hands-on part. Taking out the old cylinder is usually straightforward, but it helps to know exactly what you’re looking for. The process involves just a few simple steps, from prepping your door to unscrewing the cylinder itself. Don’t worry—you don’t need brute force for this.
A little patience and the right technique are all it takes to get the old hardware out without causing any damage to your door or the lock mechanism. We’ll walk through each step so you can feel confident as you go. If you have a mortise lock with handles, like a sashlock, you’ll need to remove those first before you can get to the cylinder.
Just follow the steps below, and you’ll have that old cylinder out in no time.
Prep Your Door and Workspace
First things first, let’s set you up for success. Open the door you’re working on and secure it so it won’t swing shut while you’re focused on the lock. A doorstop or a wedge works perfectly. This gives you easy access to the edge of the door where the lock’s faceplate is located. It also prevents you from accidentally locking yourself in or out.
If your mortise lock has door handles, you’ll need to remove them now to access the cylinder. Typically, they are held in place by a couple of screws. Having a clear, stable workspace makes the entire process smoother and safer.
Find and Loosen the Set Screw
Look at the edge of the door, on the metal faceplate of the mortise lock. You should see a screw that lines up with the bottom of your lock cylinder. This is the set screw, and its job is to hold the cylinder firmly in place. Using a flathead screwdriver, turn this screw counter-clockwise to loosen it. A key tip here is not to remove the screw completely.
Just give it four or five turns. Loosening it is enough to release the cylinder, and leaving it partially threaded in its hole will save you the headache of trying to find it and put it back in later.
A Simple Removal Process
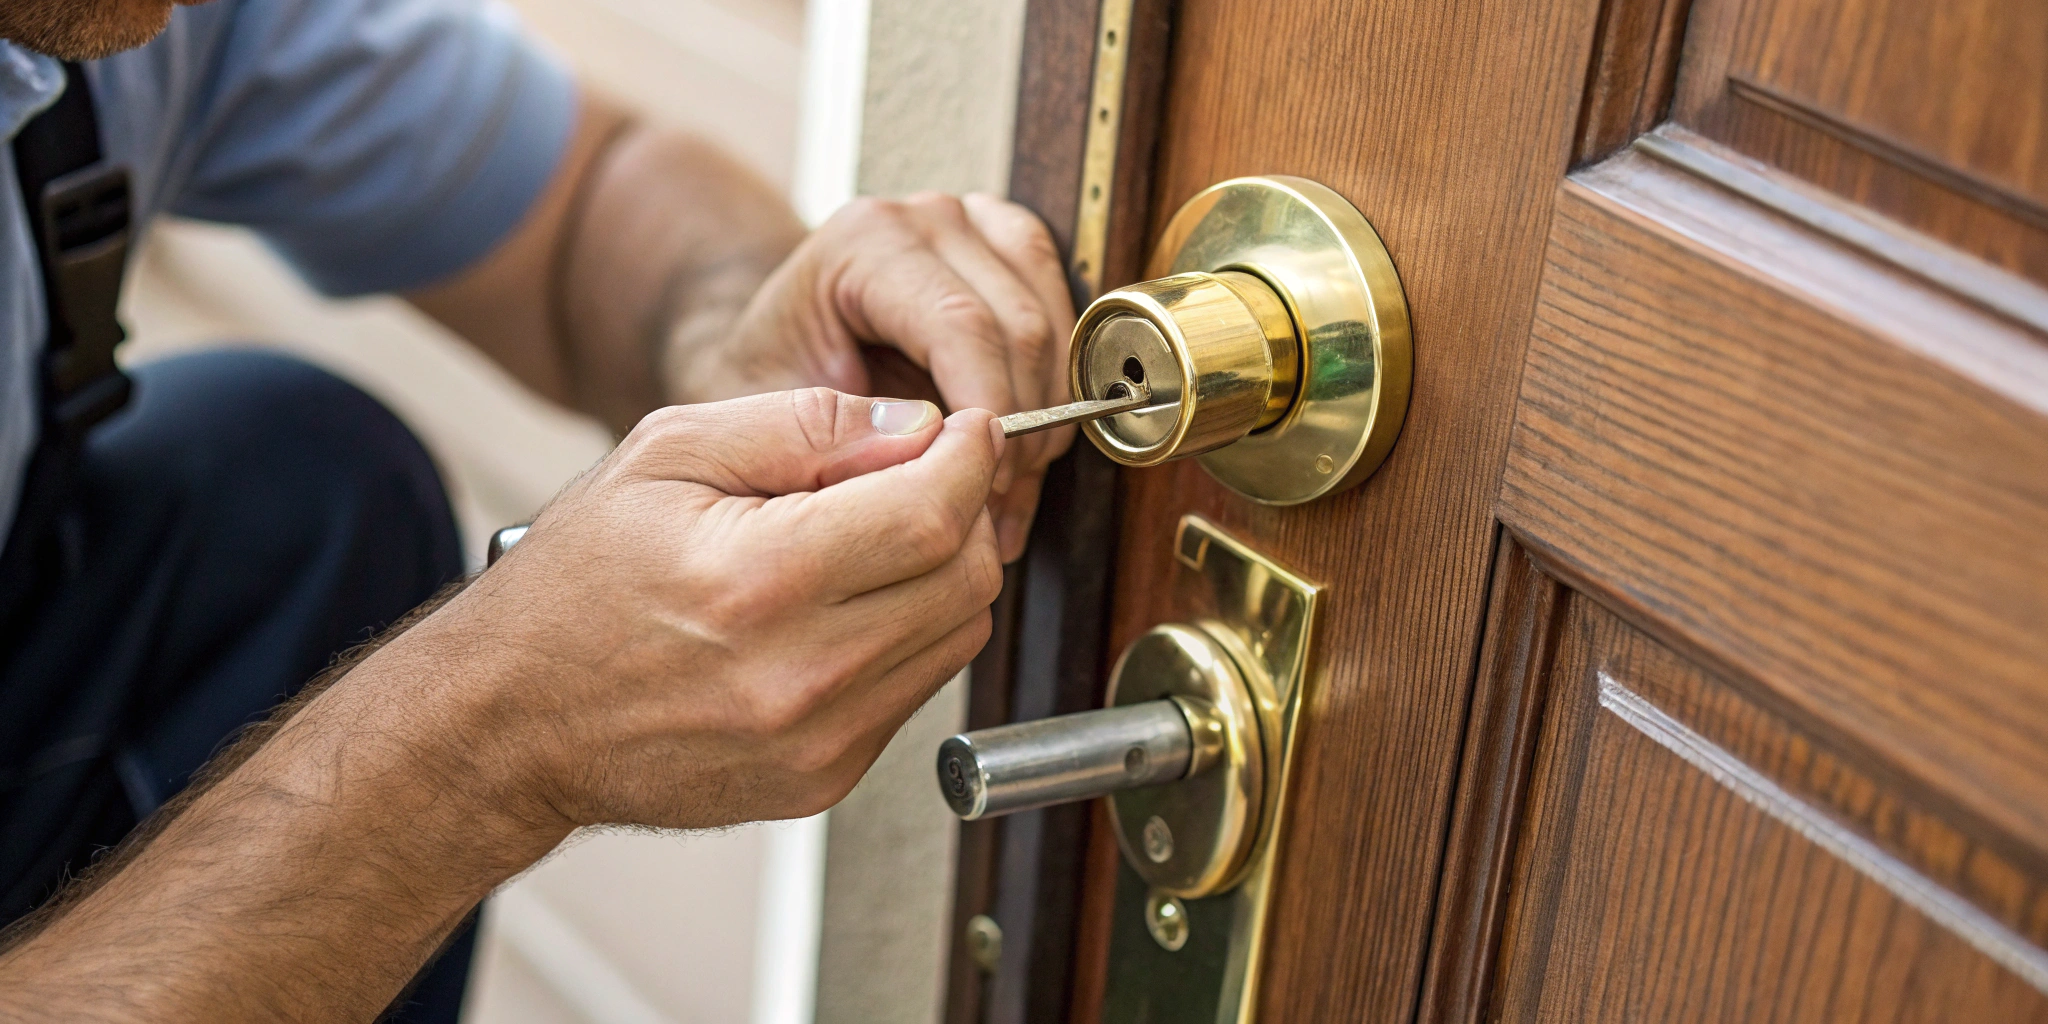
Now for the magic trick. Take the key that operates the lock and insert it into the cylinder, but only about halfway. This partial insertion allows you to turn the cam inside the lock just enough to clear the set screw you just loosened. While holding the key, gently turn the entire cylinder counter-clockwise. It should start to unthread from the lock body inside the door.
Keep turning until it comes out completely. If it feels a bit stiff, you can use the key for a little extra leverage. See? Much easier than you thought.
Dealing With a Stuck Cylinder
Sometimes, an old cylinder doesn’t want to budge due to age, dirt, or a bit of rust. If it’s stuck, try wiggling it gently as you turn. Avoid using excessive force, as you could damage the lock’s internal mechanism. If you’re replacing the cylinder entirely, it’s a great idea to snap a quick picture of the back of the old one once it’s out.
This helps you match the “cam” or tailpiece shape to ensure your new cylinder is compatible. If the cylinder absolutely refuses to come out, it’s better to stop and call for help. Our residential locksmith team can handle stubborn hardware without damaging your door.
Installing the New Cylinder
With the old cylinder out, you’re ready for the satisfying part: putting the new one in. This is where your door starts to feel secure again. Taking your time here ensures everything will work smoothly once you’re done. Just follow these steps carefully, and you’ll have a new, functioning lock in no time.
A Simple Installation Process
First, take your new cylinder and begin screwing it into the lock body in the door. A great little trick is to put the key in the cylinder and use it as a handle to turn it. This gives you better leverage and helps it glide into place smoothly. Keep turning until it’s snug. This first step is all about getting the cylinder properly seated within the lock mechanism.
It’s a straightforward task that’s a core part of many residential locksmith jobs, but it’s also one you can definitely handle yourself.
Align the Tailpiece and Cam
Before you tighten everything down, pause and take a look at the back of the cylinder. You’ll see a flat metal piece called the tailpiece. This part is crucial because it’s what actually moves the bolt inside the lock. Your new cylinder likely came with a few different tailpieces, and you need to make sure you’re using the one that’s an exact match for your old one.
Compare them side-by-side to confirm the length and shape are identical. Choosing the wrong one will prevent the lock from working, so this small check saves a lot of potential frustration.
Secure and Adjust the New Cylinder
Once the correct tailpiece is on, screw the cylinder in until it gently stops against a bar inside the lock. Now, back it off just a tiny bit—about half a turn. This small adjustment is key to preventing the lock from binding. Next, find the set screw on the edge of the door that you loosened earlier and tighten it firmly to hold the cylinder in place.
Finally, it’s time to test your work. Put the key in and turn it a few times. It should operate the lock smoothly without any sticking or catching. If it doesn’t, you may need to call for emergency locksmith assistance.
Common Mistakes to Avoid
Replacing a mortise lock cylinder is a manageable project, but a few common slip-ups can compromise your security or damage your door. Knowing what to watch out for can save you time, money, and a lot of frustration. Let’s walk through the key mistakes to avoid for a smooth installation.
Avoid Measurement and Compatibility Errors
This is where many DIY projects go wrong. While most mortise cylinders look similar, the small lever on the back, called a “cam,” is critical. If the cam isn’t the right shape for your lock—often a “clover cam”—the new cylinder won’t work. Before buying a replacement, carefully measure your existing cylinder’s length.
Taking the old one with you to the hardware store is the surest way to find a perfect match and avoid a frustrating second trip. If you’re unsure, our residential locksmith team can always help you identify the right part.
Watch Out for Installation Pitfalls
The installation process has a few tricky spots. When removing the old cylinder, a great tip is to insert the key and turn it slightly, using the key as a handle to help unscrew it. After you’ve threaded the new cylinder in and confirmed the key turns smoothly, don’t forget the final step: reattaching the faceplate. Those screws are essential for keeping your lock secure and stable within the door.
A poorly installed lock can sometimes lead to bigger issues, requiring professional door repair and installation.
Check Permissions and Building Rules
If you live in an apartment building, this step is non-negotiable. Before you change anything, you must talk to your landlord or building maintenance. Many buildings use master key systems, and an unauthorized lock change could prevent access in an emergency and violate your lease. It’s also smart to ask if the lock was changed right before you moved in.
A quick conversation ensures your new lock is compliant and saves you from a potential lockout, which might require an emergency locksmith.
Test and Maintain Your New Lock
You’ve successfully installed the new cylinder—great job! But before you put your tools away, there are a few final steps to make sure everything is working perfectly and will stay that way. Taking a few minutes to test and inspect your work now can save you from getting locked out later. Proper testing confirms the installation was a success, while a little maintenance can extend the life of your lock significantly.
Test Your New Cylinder the Right Way
First things first, let’s make sure the new cylinder actually works. Put your key in the lock and give it a few turns. The key should turn smoothly without any catching, sticking, or grinding. As you turn it, watch the lock’s bolt to ensure it extends and retracts fully and easily into the door frame.
This simple check confirms that the tailpiece is correctly aligned and the lock is functioning as it should. If you feel any resistance, it’s better to troubleshoot it now than to discover a problem when you’re in a hurry.
Simple Tips for a Longer-Lasting Lock
To help your new lock last for years, take a quick look at the old cylinder you just removed. Check the tailpiece—the flat metal bar on the back—for any signs of damage, wear, or loose screws. This can give you clues about any underlying issues with your lock mechanism that might affect the new cylinder down the line.
A little preventative maintenance, like applying a graphite or silicone-based lubricant once a year, can also keep the internal components moving smoothly and prevent rust or debris from building up.
Troubleshooting Common Problems
If your key isn’t turning smoothly, double-check that the set screw isn’t too tight and that the cylinder is sitting flush. Remember, if you’re only replacing the cylinder, it’s a fairly straightforward project. It’s best not to take the entire mortise lock assembly apart, as they can be very difficult to put back together correctly.
Also, be aware that some new cylinders are sold “unkeyed,” meaning a blank key can open them until they are pinned for a specific key. If that’s the case, you’ll need a professional to set it up. If you run into any trouble, our emergency locksmith team is always ready to help.
When to Call a Professional
There’s a real sense of accomplishment that comes from fixing something yourself. But there’s also wisdom in knowing when a project is better left to an expert, especially when it involves your security. While replacing a mortise lock cylinder can seem straightforward, a few common roadblocks can turn a quick fix into a major headache.
If you find yourself feeling frustrated or uncertain at any point, it’s a good sign to pause and consider calling for backup. A simple cylinder swap can quickly become a bigger issue if a small part is lost, a screw is stripped, or the new cylinder just won’t fit. Remember, the goal is a secure lock, and sometimes the most direct path to that is with a professional touch.
When it comes to the safety of your home or business, it’s always better to be certain the job is done right. A professional can handle the task quickly and correctly, giving you peace of mind without the stress of a tricky repair.
Below are a few specific situations where handing the tools over to a locksmith is the smartest move you can make to protect your property and your sanity.
If the Job Gets Too Complicated
Replacing just the cylinder of a mortise lock is a manageable task for many. The trouble starts if you try to disassemble the entire lock body—the large metal case inside the door. These mechanisms are packed with springs and levers that are incredibly tricky to put back together correctly.
If you’ve taken the cylinder out and are still having issues, or if you suspect the problem is with the internal lock parts, it’s time to stop. Forcing parts or taking the lock apart further can lead to permanent damage, turning a small repair into a full replacement. Our residential locksmith services are perfect for these situations, ensuring your lock is repaired without causing bigger problems.
For Master Key Systems
If you live in an apartment building in Manhattan, Brooklyn, or Queens, your lock is likely part of a master key system. This means a single key, held by your landlord or building maintenance, can open multiple doors in the building for safety and access. You should always speak with your property manager before attempting to change or rekey your lock.
Tampering with a lock in a master key system can cause issues for you and the building’s management. A professional locksmith can coordinate with your building to ensure the new cylinder works with your key and the master key, maintaining the building’s security protocol. This is a common feature in both residential and commercial properties.
How We Can Help
If you’ve run into a snag, can’t find the right replacement part, or simply want the peace of mind that comes with a professional installation, we’re here to help. A quick call can save you hours of frustration and ensure your lock is installed perfectly and functions smoothly. Our team at Golden Key Locksmith NYC is available 24/7 to handle any lock issue, big or small.
Whether you’re dealing with a stuck cylinder, a complex lock system, or find yourself locked out after a DIY attempt, you can count on our emergency locksmith team for fast, reliable service across the city.
Related Articles
- How To Change A Lock Cylinder On A Commercial Door
- Hidden Dangers: Everyday Items That Compromise Your Security
- 7 Reasons To Make An Appointment With Golden Key Locksmith NYC
- Voice Controlled Security: Hands-Free Protection
Frequently Asked Questions
Is replacing the cylinder the same as rekeying a lock? While they achieve a similar goal—making old keys obsolete—they are different processes. Replacing the cylinder means you are swapping out the entire key mechanism for a brand new one. Rekeying involves a locksmith altering the pins inside your existing cylinder so that it works with a new key. For a simple mortise lock, replacing the cylinder is often a faster and more straightforward DIY project.
How long does it typically take to replace a mortise lock cylinder? For a first-timer, you should set aside about 30 minutes for this project. This gives you plenty of time to gather your tools, carefully remove the old cylinder, and install the new one without feeling rushed. An experienced locksmith can often complete the job in just a few minutes, but taking your time is key to avoiding common mistakes.
What if my new cylinder doesn’t fit, even though I measured it? This can be a frustrating moment, but it usually comes down to a small detail. The most common issue is an incompatible “cam,” which is the small lever on the back of the cylinder. Different lock brands use different shapes.
If your measurements are correct but it still won’t work, it’s best to stop and compare the back of your old cylinder to the new one. If you can’t find a match, calling a professional is your best bet to avoid damaging the lock.
Do I need to replace the cylinder if I just want a different key? Not necessarily. If your current lock is in good working condition, you have the option to have it rekeyed by a locksmith. This is a great choice if you want to keep your existing hardware.
However, if your lock is old, sticking, or showing signs of wear, installing a brand new cylinder is a smart move that addresses both security and performance issues at the same time.
Why is my key hard to turn even after installing a new cylinder? If you’ve installed a new cylinder correctly and the key is still difficult to turn, the problem likely isn’t the cylinder itself. This usually points to an issue within the main lock body inside the door. The internal mechanism might be worn out, misaligned, or in need of lubrication.
At this point, it’s best to avoid forcing the key and call a professional to diagnose and fix the underlying problem.
Need professional help in NYC? Contact Golden Key Locksmith NYC for Commercial Door Repair or Metal Door Repair. Available 24/7 across Manhattan and all NYC boroughs.