Anyone can screw a piece of hardware onto a door frame, but getting it to sit perfectly flush and align flawlessly is what separates a quick fix from a professional installation. The difference is in the details—the precise depth of the mortise, the clean cut of the chisel, and the choice of security screws. This guide goes beyond the basics to show you how the pros get it right. We’ll walk you through how to install a door latch plate with the finesse and attention to detail that ensures a perfect fit. You’ll learn the techniques for a flawless finish, so your door not only looks great but functions securely for years to come.
Key Takeaways
- Measure twice for a one-time installation: The success of your project hinges on accurate measurements. Take the time to carefully mark your outlines and test-fit the hardware before you start cutting to avoid frustrating mistakes and ensure the latch aligns perfectly.
- Master the mortise for a smooth close: For a professional finish, the latch and strike plates must sit perfectly flush with the wood. This requires carefully chiseling a shallow recess by removing thin layers of wood until the plate fits snugly and evenly.
- Use long screws for a stronger door: The single most effective security upgrade you can make is swapping the short, included strike plate screws for 3-inch screws. This anchors the plate directly into the wall’s frame, making your door far more resistant to forced entry.
What Tools Do You Need to Install a Door Latch Plate?
Before you start any project, it’s smart to get all your ducks in a row. Installing a door latch plate is no different. Having the right tools on hand not only makes the job go smoother but also helps you get that clean, professional finish you’re looking for. A successful installation depends on precision, and the right equipment is key to achieving it. If you find your toolbox is missing a few key items, it might be a sign that a professional door repair and installation is the better route. But if you’re ready to tackle it yourself, let’s walk through exactly what you’ll need to gather, how to stay safe, and how to pick the right hardware for your door.
Gather Your Tools and Materials
To get started, you’ll want to gather a few key items. Think of this as your project toolkit. Having these ready will save you from making trips back and forth to the garage and keep your focus on the task at hand.
You’ll need:
- Drill/driver with various bits
- Spade bit (usually 7/8-inch)
- Hole saw bit (usually 2 1/8-inch)
- A sharp 1-inch chisel
- Utility knife
- Hammer
- Tape measure
- Combination square
- Phillips screwdriver
These tools will cover everything from drilling the main holes to carefully carving out the space for the plate to sit flush against the door.
Safety First: Gear and Precautions
Let’s talk safety. It’s not the most exciting part, but it’s definitely the most important. Start by putting on a pair of safety glasses to protect your eyes from wood dust and debris. When you start working with your chisel, always remember two golden rules: never chisel toward any part of your body, and always shave with the wood grain. This not only keeps you safe but also gives you a much cleaner cut, preventing the wood from splintering. Working carefully and deliberately is the best way to avoid mistakes and injuries.
Choose the Right Type of Latch Plate
Not all latch plates are created equal, and your door might have specific needs. Many new doors don’t come with pre-cut slots (called mortises) for the latch or strike plate, meaning you’ll need to create them yourself. However, some modern latches offer a “drive-in” or “press-in” style that fits into a simple round hole and doesn’t require a rectangular plate, which can save you the chiseling step. Making sure you have the right hardware is a fundamental part of any home security project, and it’s something our residential locksmith team handles every day. Check your hardware before you begin to confirm which type you have.
How Do You Prepare the Door for Installation?
Before you even think about picking up a chisel or a drill, let’s talk about prep work. Getting your door and frame ready is arguably the most important part of the entire installation. Taking your time here ensures the latch plate not only fits perfectly but also functions smoothly for years to come. Rushing through these initial steps is where most DIY projects go wrong, leading to a door that doesn’t close properly or a latch that just won’t catch.
Proper preparation sets the stage for a clean, professional-looking result. It involves careful measurements, cleaning up your workspace, and making sure your door itself is in good shape. Think of it as creating the perfect canvas. By handling these details first, you make the actual installation process much simpler and far less frustrating. We’ll walk through exactly what you need to do to get it right from the start.
Measure Twice, Cut Once
You’ve heard the old saying, and it’s a classic for a reason. When it comes to installing a door latch plate, accuracy is everything. Start by carefully marking where the latch plate will sit on the edge of the door and where the strike plate will be installed on the doorjamb. Use a pencil and a combination square to draw a crisp outline. It’s always better to chisel away a tiny bit more wood if needed than to take too much and end up with a loose, wobbly plate. A great guide on installing a lockset can provide helpful visuals for getting these initial measurements just right.
Prep the Door and Frame
With your measurements marked, it’s time to prepare the surfaces. You’ll need to create a shallow recess, called a mortise, for both the latch plate and the strike plate. This allows them to sit flush with the wood, which is essential for the door to close properly. The goal is to chisel out the area within your pencil marks so the plate can lie flat and even with the surface. To make the job easier, you can use small wedges, or shims, under the door to keep it steady while you work. This simple step prevents the door from swinging and gives you more control as you carve the mortise.
Test the Fit Before You Start
Here’s a pro tip that will save you a lot of potential headaches: test fit everything before you make any permanent cuts. Once you have your outlines drawn, hold the latch plate and strike plate in place. Does everything line up correctly? Does the plate sit neatly within your markings? This quick check allows you to spot any alignment issues early on. It’s much easier to erase a pencil line and re-measure than it is to fix a mortise that’s been chiseled in the wrong spot. Frequent test-fitting ensures you’re on the right track at every stage.
Check the Condition of Your Door Frame
Finally, take a moment to assess the overall condition of your door and its frame. Over time, houses settle and doors can begin to sag, which can throw off the alignment of a new latch. Look at the gap between the door and the frame—is it even all the way around? If the door seems a bit crooked, you might be able to fix it by simply tightening the screws on the top hinge. If you notice more significant issues like cracks or warping, these problems will need to be addressed first. A misaligned frame can make it impossible to install a latch that works correctly, and in some cases, you may need professional door repair and installation to solve the root problem.
How to Install the Latch
With your door prepped, it’s time to install the latch mechanism itself. This is the part that slides into the door’s edge and catches on the strike plate to keep it closed. Precision is your best friend here, as a poorly fitted latch can cause the door to stick or not close securely. While this guide covers the basics, remember that every door is different. If you’re working with an older frame or a high-security lock, a professional residential locksmith can ensure the job is done right without damaging your door. Take a deep breath, work slowly, and focus on getting each step just right.
Carve the Mortise
First, you need to create a shallow recess, called a mortise, for the latch plate so it sits perfectly flush with the edge of the door. Slide the latch assembly into the hole you drilled earlier and trace the outline of its faceplate onto the door with a sharp pencil. Remove the latch. Now, using a sharp chisel and a mallet, carefully carve out the wood inside your traced lines. The goal is to chisel out the entire area so the plate can sit flat and even. Don’t go too deep—you can always remove more wood, but you can’t put it back.
Master Your Chiseling Technique
Good chiseling is an art, but you can get great results by following a simple method. Start by cutting the edges of your traced outline. Hold the chisel straight up and gently tap it with a mallet to score the wood about 1/8 inch deep. This creates a clean boundary. Next, turn the chisel so the slanted side (the bevel) faces the wood you want to remove. Shave off thin pieces from the center of the mortise, working your way toward the edges. This gives you more control and prevents you from accidentally removing too much wood.
Work With the Wood Grain
For the cleanest possible cut, always pay attention to the direction of the wood grain. Think of it like petting a cat—you want to go in the direction the fibers are running, not against them. Shaving with the grain results in a much smoother finish and helps prevent the wood from splintering or chipping. If you find the wood is tearing, try chiseling from the opposite direction. This small detail makes a huge difference in the final appearance and ensures the latch plate has a solid, flat surface to rest on.
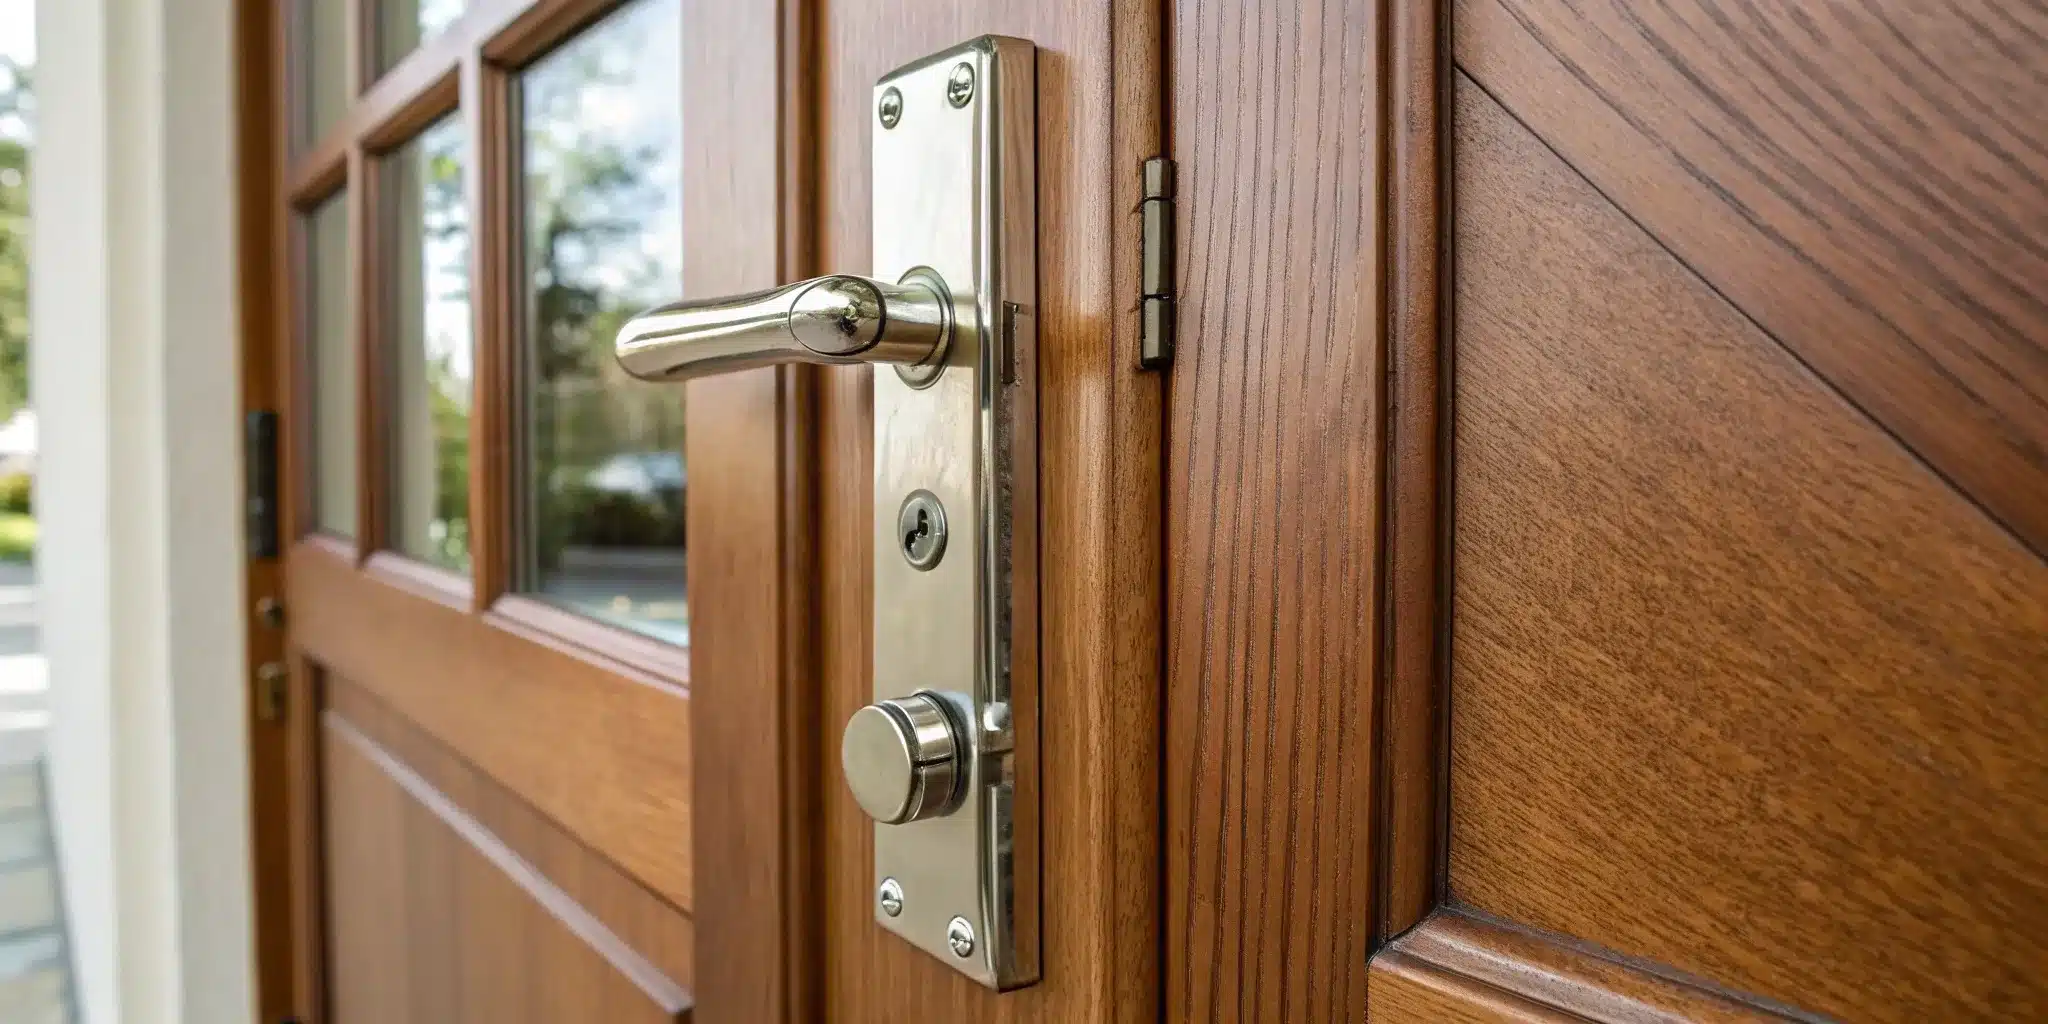
Fit and Secure the Latch Assembly
Once your mortise is carved, place the latch back into the hole to check the fit. The faceplate should be perfectly flush with the door’s edge. If it is, mark the spots for the screws. Remove the latch one last time and drill small pilot holes for the screws. This prevents the wood from splitting when you drive the screws in. For a professional finish, you can use a countersink bit to widen the top of the pilot holes slightly, allowing the screw heads to sit flush with the plate. Finally, secure the latch assembly with its screws.
Test the Mechanism
Before you move on to the strike plate, it’s crucial to test your work. With the latch installed, turn the knob or handle and watch the mechanism. Does the latch bolt retract and extend smoothly? Open and close the door a few times to make sure nothing is catching or sticking. If the latch doesn’t operate correctly, the mortise might be too deep or too shallow. Making small adjustments now will save you a headache later. If you’ve made adjustments and it’s still not right, our team can handle any door repair and installation to get it working perfectly.
How to Install the Strike Plate
Now it’s time to install the strike plate on the door frame. This small metal plate is crucial—it reinforces the jamb and securely houses the latch bolt when the door is closed. A properly installed strike plate ensures your door latches smoothly and provides the security you need.
Mark the Exact Position
Precision is key. Gently close the door until the latch bolt touches the frame, then use a pencil to mark its center. Place the strike plate on the frame, using your mark for alignment. Once it’s straight, trace the plate’s outer edge and mark the screw holes. These lines are your blueprint for a perfect fit, so double-check them before cutting.
Create the Strike Plate Mortise
For the strike plate to sit flush, you need to carve a shallow mortise. Use a utility knife to score the outline you traced, cutting as deep as the plate is thick to prevent the wood from splitting. With a sharp chisel, carefully remove thin layers of wood inside the outline. Work slowly and test-fit the plate often. The goal is a snug fit where the plate sits perfectly level with the frame.
Use the Right Security Screws
The short screws included with most locksets offer little protection. For a real security upgrade, swap them for 2.5- or 3-inch screws. These longer screws anchor into the solid wall stud behind the jamb, making the door frame far more resistant to being kicked in. This simple change is a highly effective way of protecting your home.
Get the Alignment Just Right
Proper alignment ensures your door closes securely. The strike plate must sit flush, and its opening must line up perfectly with the latch bolt. If it’s too deep, the door might rattle; too shallow, and it won’t latch. After screwing the plate in, test the door. It should click shut smoothly. If it sticks, you might need professional door repair to fix an underlying issue.
Add Weather Stripping for a Better Seal
While you’re at it, check the weather stripping. A tight seal doesn’t just block drafts—it helps the door press firmly against the frame, preventing rattling and creating a more secure closure. Close the door and look for any daylight peeking through. If you see light, your weather stripping is worn. Replacing it is an easy final touch that ensures your door is both locked tight and sealed properly.
Common Installation Mistakes to Avoid
Taking on a home improvement project like installing a door latch plate can be incredibly satisfying. But even with the best intentions, a few common slip-ups can turn a simple task into a major headache. Getting these details right is what separates a smooth, secure door from one that sticks, rattles, or won’t lock at all. It’s about more than just function; it’s about the peace of mind that comes with a job well done. While we’re all for the DIY spirit, sometimes a project can get away from you. If you find yourself with a door that’s more trouble than it’s worth, remember that our team is always here to help with professional door repair and installation services across NYC.
Inaccurate Measurements
The old saying “measure twice, cut once” is a cliché for a reason—it’s the golden rule of any installation. Being off by even a few millimeters can mean the latch bolt completely misses the strike plate, leaving you with a door that won’t stay closed. To get it right, take your time. Use a tape measure to find a consistent height, often by checking another door in your home for reference. Mark your lines clearly with a sharp pencil. Double-checking these initial marks is the single most important thing you can do to ensure a smooth process and avoid the frustration of having to redo your work.
Poor Chiseling
Creating the mortise, which is the shallow recess where the latch plate sits, requires a bit of finesse. The goal is to carve out just enough wood so the plate sits perfectly flush with the edge of the door. If you chisel too deep, the plate will sink in and the latch may not extend far enough. If it’s too shallow, the plate will stick out and prevent the door from closing properly. The key is to use a sharp chisel and work slowly, shaving off thin layers of wood at a time. Hacking away at it will only result in a messy, uneven fit that compromises the latch’s stability.
Rushing the Process
In the excitement of starting a new project, it’s easy to jump ahead. But patience is your best tool. Before you do anything, read through all the instructions to get a clear picture of the entire process. Rushing often leads to simple but frustrating mistakes like installing a piece backward, stripping screw heads, or damaging the door’s finish. A hurried job can even create a real security issue if you can’t get the door to lock properly at the end of the day. If a mistake leaves you in a jam, don’t panic; our emergency locksmith team is available 24/7 to help secure your home.
Choosing the Wrong Screws
This is a critical mistake that many people overlook, especially when it comes to security. The short screws that often come in a lockset package are usually fine for the latch plate on the door itself, but they are not strong enough for the strike plate on the frame. For any exterior door, you should use screws that are at least two inches long for the strike plate. These longer screws will go through the thin door jamb and anchor securely into the solid wood stud of the wall frame, making the door significantly more resistant to being kicked in. It’s a small change that makes a huge difference in your home’s security.
Misalignment Issues
For your door to work perfectly, the latch bolt and the strike plate must line up exactly. If they’re misaligned, you’ll notice it right away. The door might be difficult to close, you might hear a scraping sound, or it could rattle in the frame even when latched. To prevent this, make sure both plates are sitting completely flush with their respective surfaces. Before you tighten the screws all the way, gently close the door a few times to test the alignment. This gives you a chance to make tiny adjustments, ensuring the latch glides smoothly into place every single time.
Pro Tips for a Flawless Installation
Getting the latch and strike plate installed is one thing, but getting it done perfectly is another. A flawless installation means your door closes smoothly, latches securely, and looks clean. It’s the small details that make all the difference between a DIY job and a professional finish. These tips will help you fine-tune your work, so your door functions beautifully for years to come. With a little extra care, you can avoid common frustrations and feel confident in your work.
Test Your Work the Right Way
Patience is your best friend during this project. Instead of waiting until the end to see if everything works, test the fit as you go. As you chisel the mortise, place the strike plate in the cutout frequently to check the depth. You’re aiming for a snug, flush fit. Before you drill any pilot holes, double-check that the holes on your new strike plate align with your existing door hardware. This simple step prevents misalignment and ensures the latch will operate smoothly. It’s also a good idea to check how your door hangs in the frame, as doors can sag over time. If you notice any issues, it might be time for a professional door repair and installation.
Make Small Adjustments for a Perfect Fit
When chiseling, always remember that it’s much easier to remove a little more wood than it is to put it back. Work slowly and remove thin layers at a time. If you find the screw holes are slightly off or have become stripped from previous hardware, don’t worry. You can fill the old holes with wood shavings and glue, let it dry, and then drill new pilot holes for a secure fit. For minor adjustments, you can also try driving the screws in at a slight angle to catch fresh wood. These small tweaks are what separate a frustrating experience from a successful one, ensuring your hardware is perfectly seated and secure.
Why Quality Hardware Matters
The hardware you choose is just as important as how you install it. For exterior doors, always use longer screws—at least two inches—for the strike plate. These longer screws go into the wall frame, making the door much harder to break into. While no lock can make a door completely impenetrable, quality hardware is a key layer in your home’s security. It’s about making it much harder for someone to get inside. Investing in strong locks and reinforcing your door’s weak points are fundamental steps for any solid residential locksmith plan.
Keep It Working With Regular Maintenance
Once your new latch plate is installed, a little upkeep will keep it functioning properly. Periodically check the weather stripping around the door to ensure there’s a tight seal and no light shining through. This not only helps with energy efficiency but also prevents drafts that can affect the door’s alignment. Take a moment to understand how the deadlatch works—it’s the small pin on the latch that should stay pushed in against the strike plate when the door is closed. If it’s not engaged, your door isn’t as secure as it could be. Regular checks can help you catch small issues before they turn into a major problem, like needing an emergency locksmith because a faulty latch has left you locked out.
How to Troubleshoot and Make Adjustments
Even with the most careful measurements, sometimes a newly installed latch plate doesn’t work perfectly on the first try. The door might not click shut, or the latch might feel sticky. Don’t worry—this is completely normal. Most of the time, a few small tweaks are all you need to get everything working smoothly. The key is to identify the specific problem and make gradual adjustments rather than drastic changes. Think of it as fine-tuning your work to get that satisfying, secure click every time you close the door.
Fine-Tune the Alignment
Proper alignment is everything. If your door isn’t latching correctly, start by checking how it sits in the frame. Over time, doors can sag, which throws off the hardware’s alignment. A quick fix is to check the screws on the top door hinge; simply tightening them can sometimes lift the door enough to solve the problem. If that doesn’t work, you may need to deepen the mortise for the top hinge slightly to pull the door back into place. Also, double-check that the holes in your new strike plate line up perfectly with the latch. A small misalignment can be the source of the entire issue.
Solutions for Common Latch Problems
One of the most frequent issues is a latch that doesn’t fully engage. This often has to do with the deadlatch pin—that small plunger next to the main latch bolt. When the door is closed, this pin should be pressed in by the strike plate, which prevents the latch from being jimmied open. If you can push the door and the pin pops out, your strike plate is positioned too far from the door stop. You’ll need to move it inward. Another common scenario, especially with new doors, is the absence of pre-cut slots for the hardware. In this case, you’ll need to create the mortises yourself, which requires a steady hand and the right tools.
Know When to Call a Professional
There’s a fine line between a simple adjustment and a problem that requires an expert touch. If you find yourself needing to remove a lot of wood, or if you’ve made a few adjustments and things still aren’t working, it might be time to pause. Making a mistake, like cutting a mortise too deep or drilling holes in the wrong place, can permanently damage your door or frame. When you’re feeling out of your depth or are concerned about your home’s security, calling a professional is the smartest move. Our team handles door repair and installation all the time and can get your hardware working perfectly without any risk to your property.
Related Articles
- How To Fix A Broken Door Lock Step-by-Step
- DIY Guide To Fix A Door Handle That Turns But Doesn’t Open: Fix Door Handles
- HES 9500 Electric Strike Installation: A Complete Guide
- Fast & Affordable Locksmith Services (Guide)
- Need A Locksmith Near Me? How To Find The Closest Help In Upper East Side
Frequently Asked Questions
What if I accidentally chisel the mortise too deep? Don’t panic—your door isn’t ruined! This is a common slip-up, and it’s fixable. The easiest solution is to place a thin piece of wood, called a shim, in the bottom of the mortise to raise the plate back up so it sits flush. You can also use a quality wood filler. Just apply a thin layer, let it dry completely, and sand it smooth before trying to fit the plate again.
How can I tell if my door is properly aligned before I start? A quick visual check can save you a lot of trouble. Close the door and look at the gap between the door and the frame. It should be fairly even all the way around—top, bottom, and sides. If you notice the gap is much wider at the top and tight at the bottom, your door is likely sagging. Often, simply tightening the screws on the top hinge can pull it back into alignment.
Why is it so important to use longer screws for the strike plate? The short screws that come with most locksets are only long enough to bite into the thin door jamb, which isn’t very strong. By swapping them for 2.5- or 3-inch screws, you anchor the strike plate through the jamb and deep into the solid wood stud of your home’s wall frame. This makes the door significantly more resistant to being forced open and is one of the simplest, most effective security upgrades you can make.
My new latch is installed, but the door rattles when it’s closed. What’s wrong? A rattling door usually means the strike plate is set a little too far back from the door stop, so it isn’t holding the latch bolt snugly. The fix is often simple. You can try moving the strike plate slightly closer to the edge of the jamb. If that’s not possible, placing a small shim behind the plate can also help close the gap and create that firm, secure fit you’re looking for.
This seems like a lot of work. When should I just call a locksmith? If you’re starting with a brand new door that has no holes drilled, or if your door frame is cracked, warped, or otherwise damaged, it’s best to call a professional. A DIY project can become a security risk if the underlying issues aren’t addressed correctly. Also, if you’ve tried making adjustments and the latch still isn’t working smoothly, an expert can diagnose the problem quickly and save you the frustration.
Need professional help in NYC? Contact Golden Key Locksmith NYC for Commercial Door Services or Metal Door Installation. Available 24/7 across Manhattan and all NYC boroughs.