Securing your building’s exit doors presents a unique challenge: they need to be locked tight against unauthorized entry from the outside but must allow for an immediate, effortless escape from the inside. The vertical rod panic bar is the perfect solution, providing a two-point locking system that can be disengaged with a simple push. However, its effectiveness depends entirely on a correct installation. A poorly fitted bar can fail to latch securely or, even worse, fail to open in an emergency. This step-by-step guide provides a clear roadmap for a successful vertical rod panic bar installation, ensuring your exit hardware provides both reliable security and foolproof safety.
Key Takeaways
- Prep Work is Everything: Before you drill, focus on precise measurements and perfect alignment. Using the manufacturer’s template and a level will prevent the most common installation headaches and ensure the mechanism works smoothly from the start.
- Know Your Local Codes: Installing a panic bar correctly is a legal requirement. Ensure the bar is mounted between 34 and 48 inches from the floor and always confirm specific NYC regulations to keep your property safe and avoid failed inspections.
- Finish with Testing and Upkeep: Your installation isn’t truly done until you’ve tested it thoroughly. A simple monthly routine of checking, cleaning, and lubricating the hardware will ensure it remains reliable for years to come.
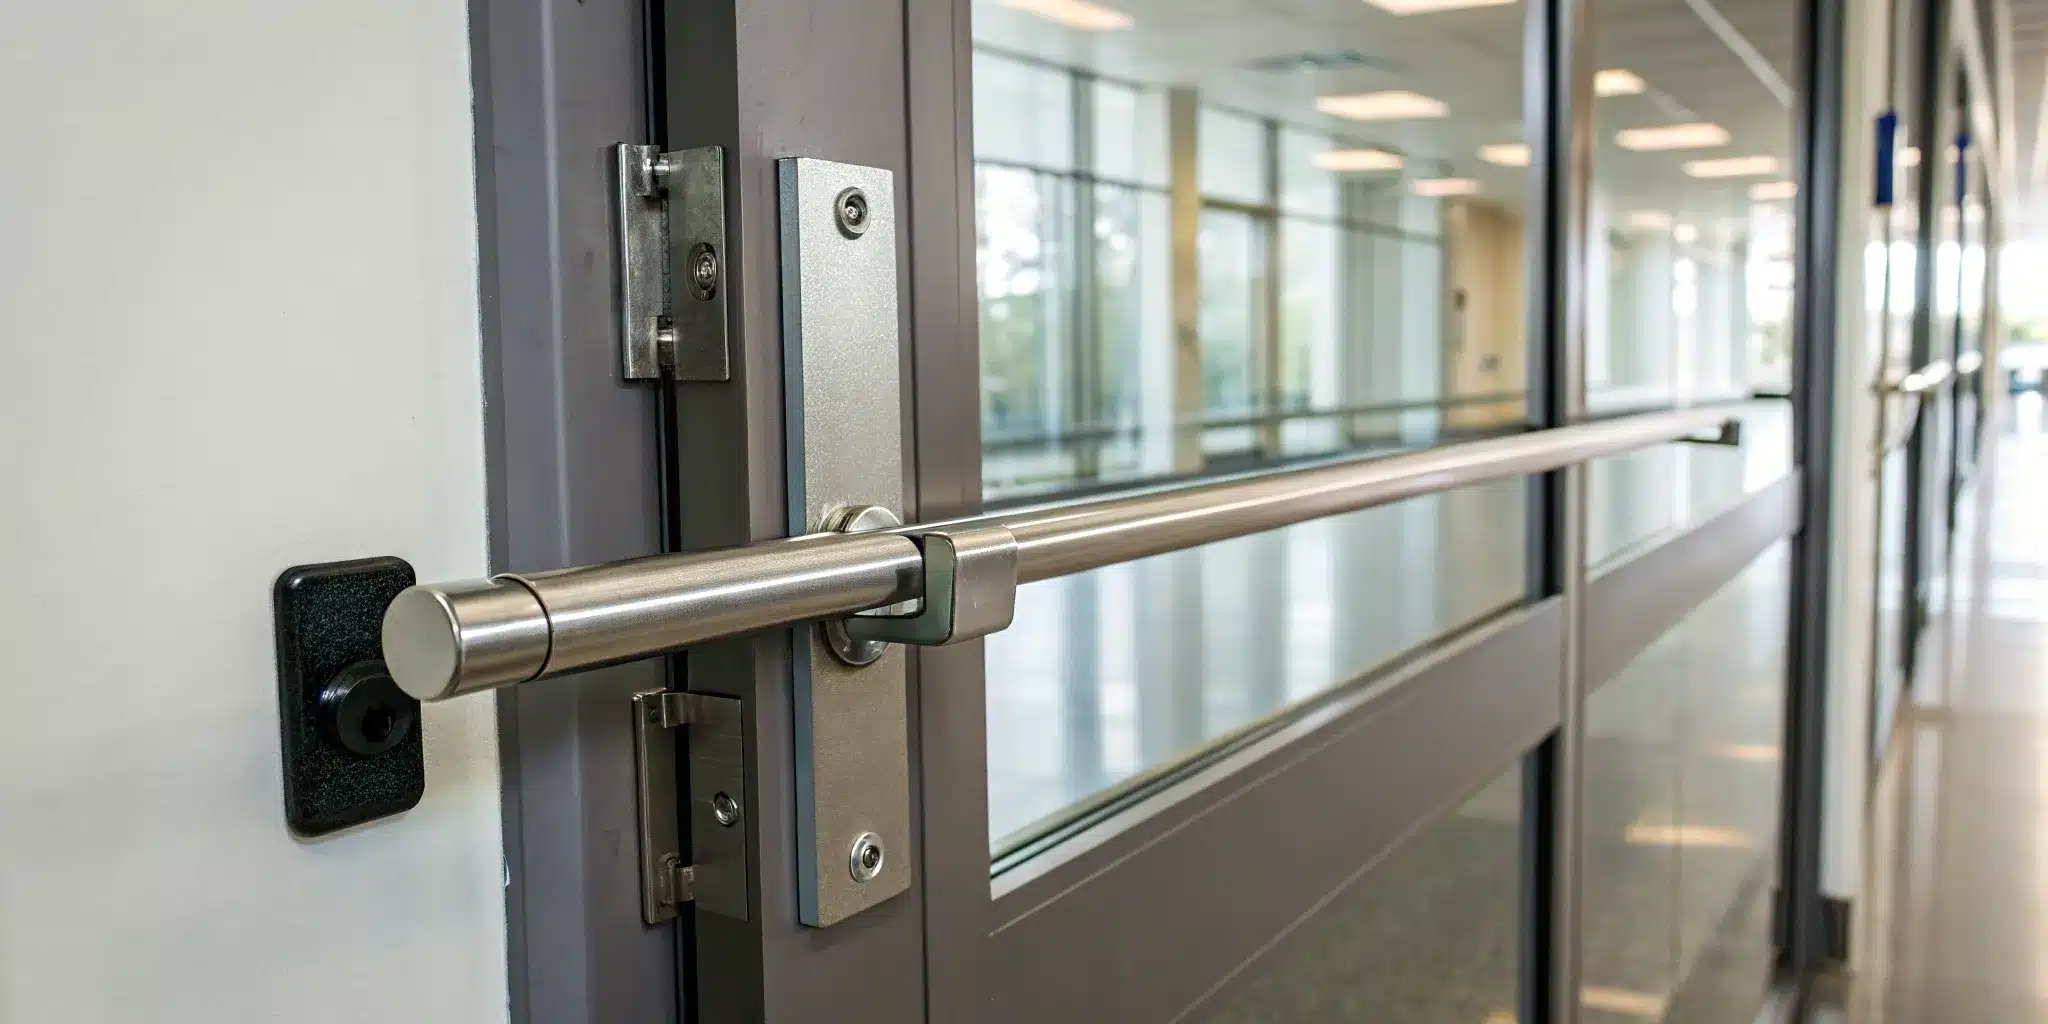
What Is a Vertical Rod Panic Bar?
If you’ve ever pushed a bar on a door to exit a movie theater, school, or office building, you’ve likely used a panic bar. A vertical rod panic bar is a specific type of this hardware, designed for double doors or single doors where a latch on the side isn’t practical. It’s an essential safety device that allows for a quick and easy exit during an emergency, all without needing a key.
The name gives you a clue about how it works: it features two vertical rods that run along the height of the door, one pointing up and one pointing down. When you push the horizontal bar, these rods retract from latches at the top and bottom of the door frame, allowing the door to swing open freely. This mechanism provides a secure, two-point locking system that is still incredibly simple to operate from the inside. You’ll often see them on fire exits, in stairwells, and on the back doors of commercial buildings. For any business owner in NYC, understanding this hardware is crucial for keeping your property safe and up to code. Proper door repair and installation ensures these systems function correctly when it matters most, providing peace of mind that your exits are both secure against intrusion and accessible for escape.
Why They’re Essential for Safety and Code Compliance
The primary purpose of a vertical rod panic bar is safety. In an emergency, like a fire, every second counts. These devices ensure that anyone, regardless of age or ability, can open an exit door quickly and without confusion. Because they don’t require twisting a knob or using a key, they prevent dangerous bottlenecks when large groups of people are trying to evacuate.
Beyond being a smart safety feature, installing panic bars is often a legal requirement. Fire safety regulations and local building codes, including the International Building Code (IBC), mandate their use in many commercial and public buildings. Meeting these standards is non-negotiable for ensuring the safety of your employees and customers. Our commercial locksmith team can help you determine the right hardware to keep your building compliant and secure.
A Quick Look at How They Work
The beauty of a panic bar is its simplicity. The entire mechanism is designed to be operated with a single push, requiring no special knowledge or effort. According to safety standards, the hardware must be operable with one hand, allowing for an immediate exit. When you press the bar, it activates an internal mechanism that pulls the vertical rods out of the strikes in the floor and the top of the door frame simultaneously.
This simple action unlatches the door, allowing it to open. To ensure they are accessible to everyone, codes require these bars to be mounted between 34 and 48 inches from the floor. This straightforward, reliable design is what makes vertical rod panic bars a cornerstone of building safety and emergency preparedness.
Gather Your Tools and Materials
Getting your tools and materials organized before you start is the secret to a smooth, stress-free installation. There’s nothing worse than getting halfway through a project only to realize you’re missing a crucial drill bit or screw. Taking a few minutes to prep your workspace and lay everything out will save you time and a major headache later. Think of it as your pre-flight check. A little preparation ensures you have everything you need to get the job done right the first time, without any frustrating interruptions. Let’s walk through exactly what you’ll need to have on hand.
Your Essential Tool Checklist
Having the right tools makes all the difference. You don’t need a professional workshop, but a few key items are non-negotiable for a secure and level installation. Before you even unbox the panic bar, make sure you have these essentials ready to go:
- Measuring Tape: Accuracy is everything. You’ll use this for measuring the door and marking exactly where the hardware will go.
- Power Drill: This is for creating the holes for your mounting screws. Make sure you have the right drill bits for your door material.
- Phillips Screwdrivers: You’ll likely need a couple of different sizes, usually a #2 and #3, for securing the panic bar and its components.
- Level: A crooked panic bar isn’t just an eyesore; it can also fail to function correctly. A level ensures everything is perfectly straight.
- Center Punch: This small tool helps you mark your drill points precisely, preventing the drill bit from wandering.
Required Hardware and Parts
Your new vertical rod panic bar will come with all the necessary hardware, but it’s smart to open the box and do a quick inventory. Lay everything out and check it against the parts list in the manufacturer’s guide. This guide is your most important resource, as every model has its own specific requirements. While you’re at it, inspect the door and frame for any damage that could interfere with a secure fit. Sometimes, a professional door repair and installation is needed to create a solid foundation for your new hardware. Make sure all rods, latches, and strike plates are accounted for before you begin.
Prepping Your Workspace and Safety Gear
A clean, clear workspace is a safe workspace. Start by clearing the area around both sides of the door so you have plenty of room to move and work. It’s also a good idea to put down a drop cloth to catch any dust or debris. Don’t forget your safety gear—a pair of safety glasses and gloves is always a smart choice. Remember, panic bars are critical safety devices, and their installation is often governed by local fire codes. For businesses, ensuring your exit hardware is installed correctly is a key part of maintaining a safe environment. If you’re unsure about compliance, our commercial locksmith services can ensure your installation meets all NYC regulations.
Prepare the Door for Installation
Before you even think about picking up a drill, let’s get the prep work out of the way. Taking the time to prepare your door properly is the secret to a smooth, frustration-free installation. It ensures your panic bar not only fits perfectly but also functions reliably, which is crucial for any commercial property. Think of it as creating a perfect blueprint—get this right, and the rest of the project will fall into place much more easily. We’ll walk through measuring, checking compatibility, and marking your lines so you can move forward with confidence.
Measure and Mark Your Door
Accuracy is everything here. To get the placement just right, you’ll need to measure from the door stop. If the vertical part of your door where the lock sits (that’s called the stile) is 4.5 inches or wider, mark a line 2.75 inches from the door stop. If your stile is narrower than 4.5 inches, your line should be exactly in the middle of the stile’s exposed width when the door is closed. Grab a tape measure and a pencil, and double-check your marks. This single step is critical for ensuring the panic bar mechanism aligns correctly and operates smoothly.
Check Door Compatibility and Alignment
Next, let’s make sure the panic bar and your door are a good match. First, check the “handing” of your door—that’s the direction it swings and where the hinges are located. The panic bar you have must be compatible with your door’s handing. Also, confirm the bar is the right size for your door’s width and height. If your door is warped or doesn’t close properly, you’ll need to address that first. A successful installation depends on a well-functioning door, so if you notice any issues, it might be time for a professional door repair.
Create Your Reference Lines
Here’s a pro tip to make marking your drill spots a breeze: use painter’s tape. Lay down strips of tape where your reference lines will go. This gives you a clear surface to draw on without leaving permanent marks on the door. Once your tape is in place, position the paper template that came with your panic bar, aligning it with the lines you just measured. Tape the template down securely. Then, use a center punch to make a small indent at each drill spot marked on the template. This keeps your drill bit from wandering and ensures your holes are perfectly placed.
Install Your Panic Bar: A Step-by-Step Guide
Alright, you’ve got your panic bar and you’re ready to install it. This process requires precision, but by following these steps carefully, you can get it done. Remember, this hardware is a key part of your building’s safety system, so taking your time is essential. If you’re working on a commercial property in NYC, ensuring the installation meets all local codes is non-negotiable. For peace of mind and guaranteed compliance, working with a professional commercial locksmith is always your best bet. But if you’re tackling this yourself, let’s get started.
Mount the Main Panic Device
First things first, let’s get the main device mounted. This is the core component that houses the mechanism, so a secure fit is crucial. Start by sliding the square shaft of the device into the lever handle. Once it’s in place, position the panic device head on the door according to your template markings. Use at least two screws to secure it firmly to the door. Don’t rush this part—a wobbly main device will cause problems for the entire system. Think of this as the foundation of your installation; if it’s not solid, nothing else will align or function correctly.
Attach the Horizontal Push Bar
Here’s a little tip that will make your life easier: detach the horizontal push bar from the main device before you go any further. Trying to mount the entire assembly at once can be awkward and lead to misalignment. By separating the two pieces, you can focus solely on getting the main device perfectly positioned and secured without a long bar getting in your way. Once the main device is solidly in place, you can reattach the push bar. This simple extra step ensures a more manageable and precise setup, saving you a lot of potential frustration down the line.
Install the Top and Bottom Latches
Now it’s time to install the latches that will secure the door at the top and bottom. Precision is key here. Use the manufacturer’s template to find your exact placement. A great way to do this is to first find the center mark on your door, which is usually two and a quarter inches from the edge. To make the template even easier to use, you can cut a small V-shape into it to help you line it up perfectly with your center mark. Getting these latches positioned correctly is a critical part of any door repair and installation project, as it ensures the door will lock securely every time.
Connect and Secure the Vertical Rods
The vertical rods are what connect the push bar to the top and bottom latches. When you inspect the rods, you’ll notice one end is threaded and the other is not—this is important for connection. Depending on your door’s height, you may need to trim the rods for a proper fit. For example, on a standard 68- or 70-inch door, you might need to cut two to four inches off the non-threaded end. Measure carefully before you cut! An incorrectly sized rod won’t engage the latch correctly, which defeats the purpose of the panic bar. Take your time to get the length just right for smooth operation.
Fit the Strike Plates to the Door Frame
The final step is to install the strike plates on the door frame where the latches will connect. Using the marks you made earlier, position the top strike plate. You’ll notice it has two large slotted holes and one center hole. Here’s a pro tip: secure the plate using the two slotted holes first. This design allows you to make small adjustments to the plate’s position to get the perfect alignment with the latch. Once you’re confident the latch engages smoothly, you can add the final screw in the center hole to lock it firmly in place. Repeat the process for the bottom strike plate.
Adjust and Test Your Installation
You’re on the home stretch! With the main components in place, it’s time to make the small adjustments that ensure your panic bar works smoothly and reliably. This final phase is all about precision and testing. Taking the time to get these details right is what separates a functional installation from a flawless one. If you find the door itself is warped or damaged, making these adjustments difficult, our team can help with professional door repair and installation. Let’s walk through the fine-tuning process step by step.
Fine-Tune the Vertical Rods
Getting the vertical rods to the perfect length is essential for the locking mechanism to work correctly. Start by disconnecting the bottom rod from the central device. You can adjust its length by turning it clockwise to shorten it or counterclockwise to lengthen it. The goal is to ensure the bottom bolt extends fully into its strike plate on the floor. At the same time, when the push bar is pressed and the top bolt retracts, the bottom bolt should retract smoothly with it. This synchronized movement is key to the panic bar’s function.
Adjust the Strike Plates for a Secure Latch
Next, let’s make sure the latches have a secure home. The strike plates are the metal plates on the door frame that the latch bolts slide into. Mark the exact spots for the top and bottom strikes on the frame. Drill and tap the holes at your marks, then screw the top strike plate into place. For the bottom strike, use your vertical reference line to ensure it aligns perfectly with the bottom latch bolt. Proper alignment here is non-negotiable—it’s what guarantees the door will latch securely every single time it closes, keeping your property safe.
Test the Door’s Functionality
Now for the moment of truth. It’s time to test your work. Open and close the door several times, listening and feeling for smooth operation. Does the door latch securely without needing an extra push or pull? When you press the panic bar, do both the top and bottom latches retract instantly, allowing the door to open freely? Give the bar a few firm presses from different angles. If everything works seamlessly, you’ve done a great job. If you notice any sticking, grinding, or hesitation, it’s best to revisit the adjustments or call in a commercial locksmith to ensure it’s perfectly safe.
Common Installation Mistakes to Avoid
Installing a vertical rod panic bar is a precise job where small errors can lead to big problems. Even if you’re handy with tools, a few common missteps can compromise the device’s safety and functionality. Getting it right the first time not only ensures the panic bar works in an emergency but also saves you from future headaches and potential repair costs. Let’s walk through the most frequent mistakes so you can steer clear of them.
Incorrect Height and Alignment
One of the most critical and commonly overlooked details is the installation height. Building codes are very specific, requiring panic hardware to be mounted between 34 and 48 inches from the floor. Placing it too high or too low can make it difficult for people to use in a panic, defeating its purpose. Proper alignment is just as important. If the device isn’t perfectly level and square with the door, the rods and latches won’t engage correctly, which can cause the door to jam or fail to lock securely. This is a crucial detail for any commercial locksmith installation.
Ignoring the Manufacturer’s Guide
It’s tempting to rely on a general YouTube tutorial or past experience, but every panic bar model is slightly different. The manufacturer’s instructions are your single most important resource. These guides provide the exact measurements, screw types, and step-by-step processes tailored to that specific device. Ignoring them can lead to using the wrong hardware, drilling holes in the wrong places, or assembling parts in the incorrect order. Always treat the included manual as your definitive guide to avoid preventable errors and ensure a secure, reliable installation.
Improper Drilling and Mounting
A securely mounted panic bar starts with proper drilling. For wood doors, it’s best to drill smaller pilot holes first to guide the bit, then drill the larger holes from both sides to prevent the wood from splintering. Forgetting this step can damage your door and create a weak anchor point for the hardware. Similarly, using screws that are too short or failing to tighten the mounting bolts adequately will result in a loose device that feels flimsy and may fail under pressure. A wobbly panic bar is an unreliable one, and you may end up needing a professional door repair.
Skipping the Final Test
Once the last screw is in, the job isn’t quite finished. A common mistake is failing to test the panic bar thoroughly. Don’t just press it once and call it a day. Open and close the door multiple times from both the inside and outside. Push the bar slowly, then quickly. Make sure the latches engage smoothly with the strike plates every single time without sticking or grinding. This final check confirms that everything is aligned and functioning as it should, giving you peace of mind that it will work flawlessly when you need it most.
Understand Key Building Codes
Installing a panic bar isn’t just about attaching hardware to a door; it’s about ensuring safety and meeting legal requirements. Building codes can seem intimidating, but they exist for a very good reason: to make sure everyone can exit a building quickly and safely during an emergency. Getting these details right is a critical part of the installation process, especially for commercial properties. It protects people and keeps your business compliant. Let’s walk through the key codes you need to know.
Height and Placement Standards
One of the most important rules for panic bar installation is getting the height just right. According to building codes, panic hardware must be mounted so the activating part of the bar is between 34 and 48 inches from the finished floor. This specific range isn’t arbitrary—it ensures the bar is accessible to everyone, including children and individuals in wheelchairs. Placing it too high or too low could make it difficult for someone to use in a panic. Before you drill any holes, measure carefully from the floor up to ensure your markings fall squarely within this required zone. This simple step is fundamental to a safe and compliant installation.
Fire Safety Code Compliance
Panic bars are a critical component of a building’s fire safety and egress system. Various fire safety regulations govern their use, especially on doors that are part of a designated fire exit route. These codes ensure that exit doors can be opened easily from the inside with a single motion, without needing a key or any special knowledge. Failing to comply can result in failed inspections, fines, and, most importantly, a serious safety hazard. Before you begin your project, it’s wise to familiarize yourself with the fire codes that apply to your building type to ensure your installation meets all necessary safety standards for emergency situations.
Checking Local NYC Requirements
While national standards provide a great baseline, New York City often has its own specific building code requirements. The International Building Code (IBC) includes clear mandates for panic bars in commercial and public buildings, but it’s crucial to verify local NYC amendments. These rules can impact everything from the type of hardware you can use to specific installation details. To avoid any compliance issues, always check the latest New York City building codes. If you’re unsure about any requirements, our team at Golden Key Locksmith NYC is always up-to-date on local regulations and can handle your commercial locksmith needs correctly from the start.
Troubleshoot Common Installation Issues
Even when you follow the instructions perfectly, you can still run into a few snags. Don’t worry—most common installation issues have straightforward fixes. Before you get frustrated, walk through these troubleshooting steps to see if you can solve the problem.
Fixing Misalignment Problems
If the door won’t latch or the push bar feels stiff, the first thing to check is alignment. A panic bar that isn’t perfectly level won’t function correctly. Grab your level and place it on the main device to see if it’s straight. If it’s crooked, loosen the mounting screws slightly, adjust the bar until it’s level, and then retighten everything securely. Also, double-check that all bolts are tight. A misaligned bar isn’t just an inconvenience; it’s a safety risk that could fail in an emergency. If you’ve tried adjusting it and something still feels off, our emergency locksmith team can help get it working safely.
Securing a Loose or Unstable Mount
A wobbly panic bar is a definite red flag. The device should feel completely solid and integrated with the door. If you notice any give or movement when you press the bar, stop and check every mounting screw and bolt immediately. Tighten anything that feels loose. Sometimes, the issue isn’t the hardware but the door material itself—the screw holes may have become stripped during installation. This can compromise both security and safety compliance. For businesses, ensuring a secure mount is critical, and our commercial locksmith services can professionally anchor the device and ensure it meets all city codes.
Solving Operational Glitches
Sometimes the bar is aligned and secure, but the latches just won’t engage with the strike plates. This can happen if the vertical rods are binding or if there’s an internal mechanism issue. Check the path of the rods to make sure they move freely without scraping against the door or any hardware. You can also test the latch mechanism by hand to see if it retracts and extends smoothly. Over time, panic bars can wear down and develop glitches. If you’re dealing with an older unit, it might be time for a professional service or an upgrade to modern security systems that integrate with alarms and access control.
Maintain Your Vertical Rod Panic Bar
Once your vertical rod panic bar is installed, the job isn’t quite done. Regular maintenance is the key to making sure this critical safety device functions correctly for years to come. Think of it like any other important piece of equipment in your building—a little bit of attention goes a long way in preventing major problems. Consistent upkeep ensures the mechanism operates smoothly, remains compliant with safety codes, and is ready to perform in an emergency. Neglecting it can lead to malfunctions that compromise the security and safety of your building. A well-maintained panic bar provides peace of mind, knowing that your exit doors are always prepared for a quick and easy escape. The following steps will help you create a simple but effective maintenance routine.
A Simple Inspection and Testing Schedule
Set aside a few minutes each month to give your panic bar a quick check-up. This simple routine can help you spot minor issues before they turn into serious safety hazards. First, push the bar and listen. The mechanism should be quiet, and the latches should retract smoothly without any grinding or squeaking. Next, open the door completely to make sure it doesn’t stick or catch. While you’re at it, give the entire assembly a visual once-over. Look for any loose screws, signs of rust, or visible damage to the bar or rods. If anything seems off, don’t ignore it. Regular inspections are essential because these are essential safety devices that require proper attention to guarantee they work when you need them most.
Cleaning and Lubrication Tips
Keeping your panic bar clean and lubricated is fundamental to its operation. Start by wiping down the entire unit with a soft, damp cloth to remove dust and grime that can build up and interfere with the mechanism. Avoid harsh chemical cleaners, as they can damage the finish and internal components. After cleaning, apply a silicone-based lubricant to all moving parts, including the latch bolts and the points where the rods move. This prevents friction and ensures a smooth release. While you’re there, check the alignment of the bar to confirm it’s level and that all mounting bolts are tight. A sagging door can throw off the alignment, so if you notice issues, it might be time for a professional door repair.
When to Call Golden Key Locksmith NYC for Help
While basic maintenance is straightforward, some issues require an expert touch. If you notice the panic bar is bent, the latches fail to engage correctly, or the door is difficult to open even after cleaning and lubrication, it’s time to call a professional. Attempting complex repairs yourself can lead to further damage or compromise the device’s safety features. Our team at Golden Key Locksmith NYC specializes in commercial locksmith services and can handle any repair or adjustment your panic bar needs. Hiring a certified technician ensures the hardware is aligned properly and meets all stringent NYC fire safety regulations. Don’t hesitate to reach out, especially if it’s an urgent safety concern.
Related Articles
- The 6-Step Balanced Door Hardware Installation Guide
- A Guide To Balanced Doors For Historic Buildings
- Commercial Door Services
Frequently Asked Questions
Is installing a panic bar a project I can do myself? While it’s technically possible if you have the right tools and experience, this is one project where precision is everything. A panic bar is a life-safety device, and an incorrect installation can fail during an emergency or violate local building codes. For commercial properties, I always recommend hiring a professional commercial locksmith to ensure the installation is secure, functional, and fully compliant with all NYC regulations.
How do I know if my building legally needs a panic bar? Generally, building codes require panic bars in places with a certain number of occupants, like schools, theaters, large offices, and restaurants. The rules are based on factors like the building’s use and how many people it holds. Since navigating NYC’s specific building and fire codes can be complex, the surest way to know is to have a professional locksmith assess your property’s exit doors.
Can I install a vertical rod panic bar on any door? Vertical rod panic bars are designed for specific types of doors, most commonly commercial-grade hollow metal or solid wood doors. The door must be in good condition and properly aligned for the hardware to function correctly. Installing one on a residential door or a door that is warped or damaged will likely lead to problems, so it’s important to first ensure your door is a suitable candidate.
My panic bar feels stiff or is hard to push. What’s the first thing I should do? The first and easiest thing to check is cleanliness and lubrication. Dust and grime can build up in the mechanism over time, causing it to stick. Try cleaning the device and applying a silicone-based lubricant to the moving parts. If that doesn’t solve the problem, it’s likely an alignment issue with the rods or latches, which may require a professional adjustment to fix.
How long does a panic bar typically last? A high-quality, well-maintained panic bar can last for many years, even a decade or more. However, its lifespan really depends on how often it’s used. A device on a high-traffic main exit will experience more wear and tear than one on a rarely used emergency door. Regular inspections are the best way to catch signs of wear early and decide when a repair or replacement is needed.
Need professional help in NYC? Contact Golden Key Locksmith NYC for Metal Door Installation or Sliding Door Services. Available 24/7 across Manhattan and all NYC boroughs.