That heavy, classic lock on your apartment door is a mortise lock, a true workhorse of home security common in buildings across New York City. When it works, it feels solid and reliable. But when the handle starts to wobble or the key begins to stick, it’s more than just an annoyance; it’s a crack in your home’s first line of defense. Before you rush to replace the entire thing, know that many common issues can be fixed with a little patience and the right guidance. This guide is designed to help you confidently repair a mortise lockset, walking you through identifying the problem, gathering your tools, and completing the fix step-by-step.
Key Takeaways
- Prepare your workspace for a smooth repair: Before you begin, gather all your tools and set up an organized area. Use a magnetic tray for tiny screws and take photos as you disassemble the lock to create a simple visual guide for putting it back together.
- Clean, inspect, and lubricate correctly: A successful repair depends on the details. Thoroughly clean all internal parts to spot wear or damage, and always use a dry lubricant like graphite powder, since oily sprays attract dirt and will eventually gum up the mechanism.
- Know when to hand it over to a pro: If the damage is more complex than you first thought, you’re working with a high-security or antique lock, or you just need a guaranteed fix right away, calling a professional locksmith is the safest and most efficient solution.
What Is a Mortise Lock?
If you live in a classic New York City apartment or work in an older commercial building, you’ve probably used a mortise lock. It’s a heavy-duty lock that sits inside a deep pocket, or “mortise,” cut into the edge of the door. Unlike a standard cylindrical lock that’s just drilled through the door’s face, this design integrates the lock mechanism directly into the door’s structure. This makes it incredibly durable and much more secure against forced entry.
You can usually spot a mortise lock by its solid metal faceplate on the door’s edge and the combination of a latch and a separate deadbolt operated by the same lever or knob. They are built to last, which is why so many are still functioning perfectly in buildings across Manhattan, Brooklyn, and Queens. Their strength and reliability also make them a popular choice for modern commercial locksmith applications and high-end residential homes. Their robust construction means they can withstand heavy use, but like any mechanical device, their internal parts can wear out over time.
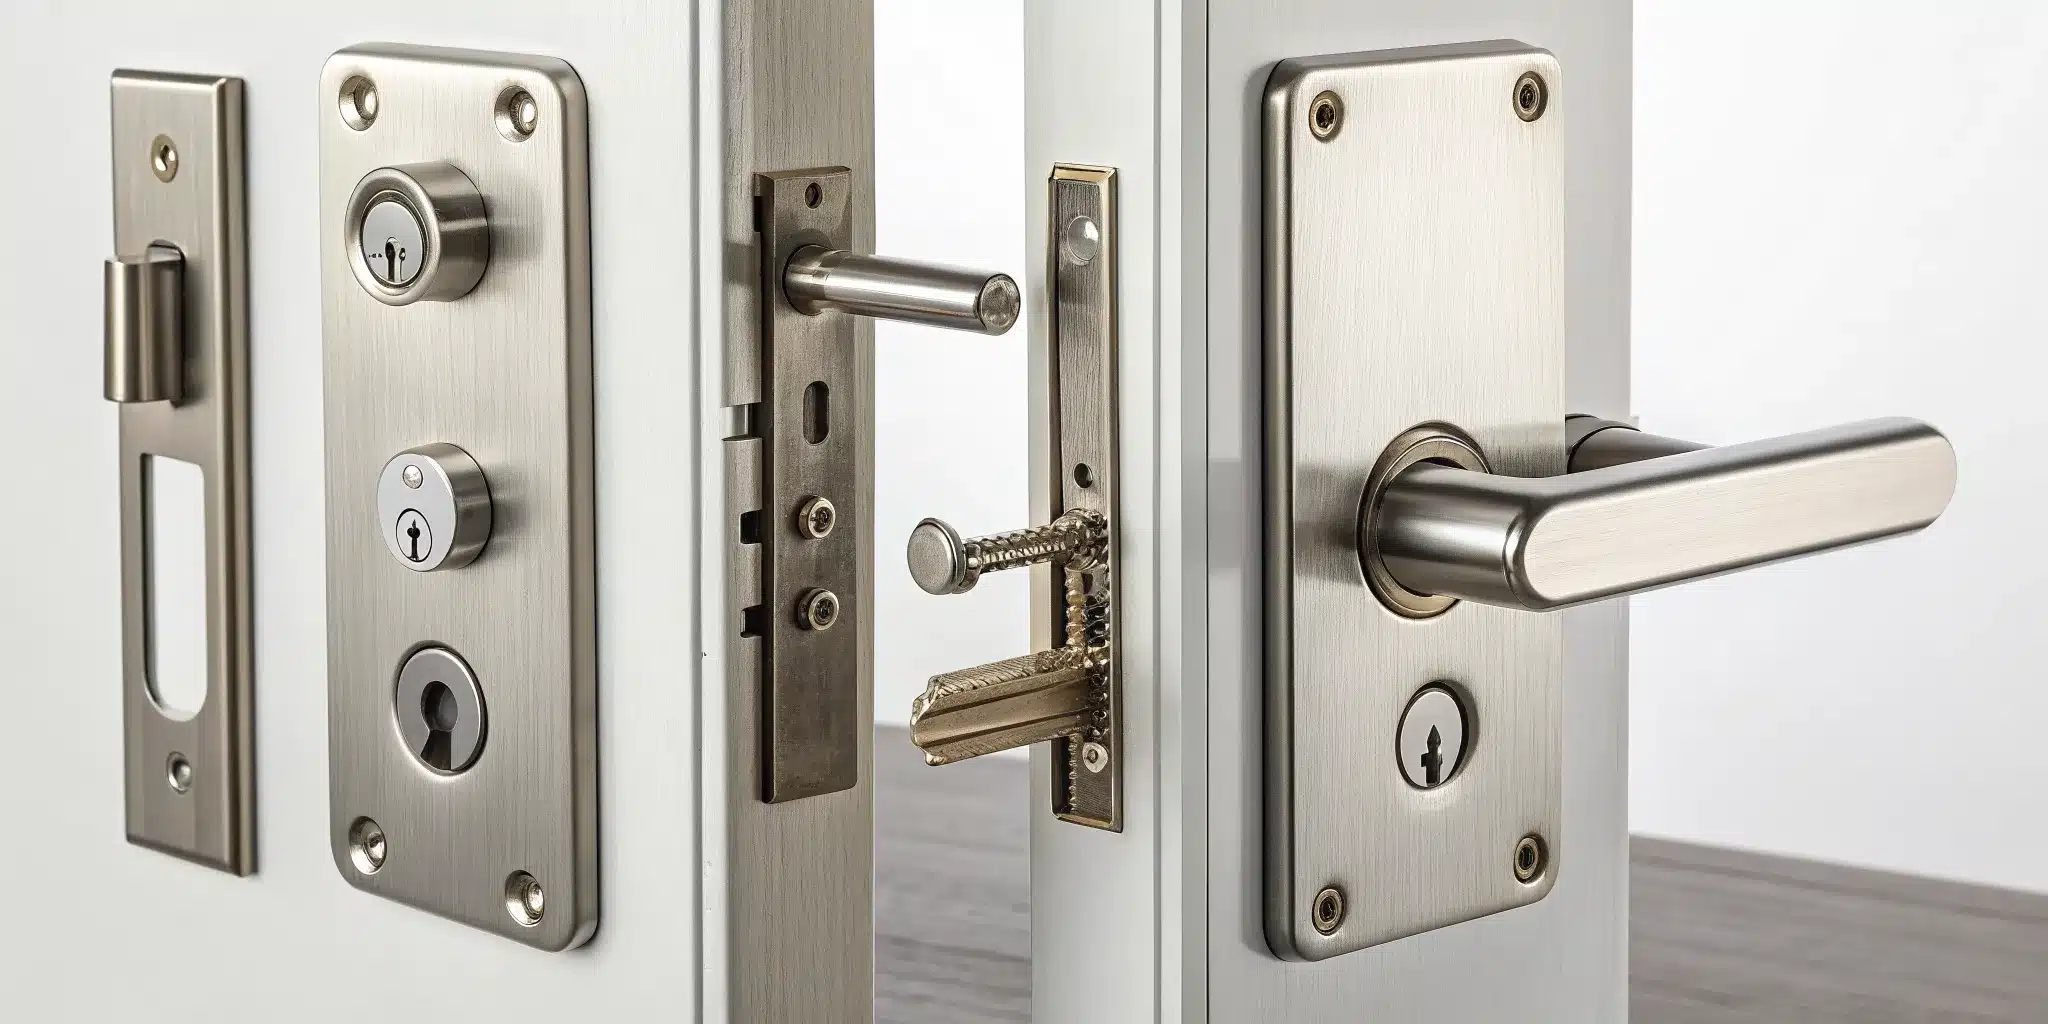
Key Components of a Mortise Lock
Getting to know the parts of your mortise lock can help you understand what might be going wrong. While it looks complex, it’s made up of a few key components working together inside the lockbox, the main case hidden inside your door.
Here’s a quick rundown of the essentials:
- Lock Cylinder: This is where you insert your key to operate the deadbolt.
- Deadbolt: A solid metal bolt that extends into the doorframe for maximum security.
- Latch: The spring-loaded part that keeps the door shut even when it’s unlocked.
- Lever or Knob: The handle you turn to retract the latch.
- Faceplate: The metal plate you see on the door’s edge that holds everything in place.
Common Mortise Lock Problems
Even the toughest locks can run into trouble after years of use. You might find that your key suddenly stops working smoothly or doesn’t work at all. Another frequent issue is a doorknob or lever that feels loose, jiggles excessively, or just spins without actually opening the door.
Sometimes, the lock can feel stiff, sticky, or get stuck, making it a real struggle to lock or unlock. These issues often point to internal parts that have worn down, broken, or simply shifted out of place. Because all the components are housed together, a problem with one small part can affect the entire lock’s function.
Signs Your Lock Needs Repair
It’s best to address lock issues before they turn into a full-blown lockout. A key sign that your mortise lock needs attention is a wobbly handle. This often points to a loose set screw or a worn-out internal part called a hub. You might also notice that you have to jiggle the key or push the door just right to get the lock to catch.
If the deadbolt doesn’t extend or retract smoothly, or if the latch doesn’t spring back into place properly, it’s a clear signal that something is wrong inside the lockbox. Don’t ignore these warnings. A failing lock compromises your security and can leave you in a tough spot. If you notice any of these signs, it might be time to call an emergency locksmith to get it fixed correctly.
What Tools and Materials Do You Need?
Before you take anything apart, it’s smart to gather everything you’ll need for the job. Working on a mortise lock isn’t overly complicated, but having the right tools on hand makes the process much smoother and helps you avoid damaging your door or the lock itself. Think of it like preparing your ingredients before you start cooking; a little prep work up front saves you from scrambling later. Most of the items you’ll need are probably already in your toolbox, so let’s run through the essentials.
Your Essential Repair Toolkit
You don’t need a workshop full of specialized equipment for this project. Your basic toolkit should include a good set of screwdrivers for removing the lockset and its internal components. A putty knife is also helpful for gently prying off faceplates or trim without leaving scratches. You may need a hammer for tapping out stubborn pins and a sharp chisel if you need to make any slight adjustments to the wood mortise pocket in the door. Finally, a combination square will be your best friend when it’s time to put everything back, ensuring every part is perfectly aligned for smooth operation.
Preparing Your Workspace for Safety
Safety should always be your top priority. Before you begin, find a clean, well-lit area to work where you can lay out all the small pieces of the lock without losing them. A magnetic tray or a few small containers can be a lifesaver for keeping tiny screws and springs organized. Most importantly, always wear safety goggles. You’ll be working with small metal parts that can sometimes fly loose, and protecting your eyes is a simple step you should never skip. A safe workspace is an efficient workspace, letting you focus entirely on the repair.
Sourcing Replacement Parts
Sometimes, a repair is as simple as replacing a single worn-out spring. You can often find these small components at a local hardware store. If a more significant part is broken, your best bet might be finding a similar vintage lock at a salvage shop or online to use for spare parts. Finding an exact match for an older or more obscure lock can be a challenge. If you find yourself stuck searching for a specific component or realize the problem is more complex than you thought, it might be time to call in a professional for a residential locksmith service to get the job done right.
Repairing Your Mortise Lock, Step by Step
Ready to get hands-on with your mortise lock? Taking on this repair yourself can be a rewarding project. The key is to work slowly, stay organized, and follow a clear process. We’ll walk through each stage, from removing the lock from your door to putting it all back together again. Just remember to set up in a well-lit area where you won’t lose any small screws or springs. With a little patience, you can get that classic lock functioning smoothly again.
Step 1: Remove the Lockset from the Door
First, you need to get the lock out of the door. Start by locating the small screw on the edge of the door, in line with the key cylinder, and remove it. This will allow you to unscrew the thumb turn on the inside and gently pull the key cylinder out. Next, find the screw holding the doorknob in place, loosen it, and slide both knobs off the spindle. Finally, unscrew the faceplate on the edge of the door and carefully pull the entire lockbox out of its pocket, or mortise. If the fit is tight, you may need to wiggle it a bit.
Step 2: Disassemble the Lock Mechanism
Place the lockbox on a clean, flat surface. Before you open it up, grab your phone and take a quick picture of how everything is assembled. This photo will be your best friend when it’s time to put it all back together. Once you have your reference shot, carefully remove the screws holding the cover plate on. Lift the plate off slowly and be mindful of any small springs or parts that might try to pop out. Set the cover and screws aside somewhere safe so you don’t lose them.
Step 3: Clean and Inspect the Components
With the lock’s inner workings exposed, it’s time for a thorough cleaning. Old grease and grime can cause a lot of problems. Use a good degreaser and a small brush to clean every part inside the lockbox. As you clean each component, give it a close look. You’re searching for any signs of excessive wear, cracks in the metal, or warping that could be causing the lock to stick or fail. A clean lock is much easier to inspect, so don’t skip this step. This detailed inspection is crucial for a successful repair.
Step 4: Replace Any Damaged Parts
Now that everything is clean, you can clearly see what needs attention. Look for broken springs, bent levers, or parts that have worn down over time. The latch and deadbolt components are common culprits for wear. If you find a broken or damaged part, you’ll need to find an exact replacement. Sourcing parts for older mortise locks can sometimes be tricky, but it’s essential for a lasting repair. Take the damaged part with you to a hardware store or search online using any part numbers you can find. A mismatched part can compromise the lock’s security and function.
Step 5: Reassemble and Reinstall the Lock
Once you have your replacement parts, it’s time to reassemble the lock. Use the photo you took earlier as your guide to make sure every spring and lever goes back in its proper place. After the lockbox is back together, you can reinstall it in the door. If you find that the screw holes in the wood are stripped, a little wood putty can solve the problem. Just fill the holes, let the putty dry completely, and then you can drill new pilot holes for a secure fit.
Step 6: Test and Make Final Adjustments
Before you call the job done, test the lock thoroughly. With the door open, turn the key and thumb turn to make sure the deadbolt and latch move smoothly. Then, close the door and test it again. Check that the door is aligned correctly in its frame and that the latch and deadbolt engage properly with the strike plate. If anything feels stiff or misaligned, you may need to make small adjustments. For complex alignment issues, our residential locksmith team can ensure everything lines up perfectly for optimal security.
Common Repair Mistakes to Avoid
Taking on a mortise lock repair yourself can be a rewarding project, but a few common missteps can turn a simple fix into a major headache. It’s easy to get tripped up by the small details, from losing a tiny screw to using the wrong kind of lubricant that gums up the works. Knowing what to watch for will help you get the job done smoothly and correctly the first time. It’s all about being patient, organized, and using the right materials for the job. By avoiding these frequent errors, you can ensure your lock works perfectly and keeps your home secure for years to come. If you find the repair is more complex than you thought, remember that a professional is always just a call away.
Keeping Track of Parts
A mortise lock has many small, intricate components, and losing even one tiny screw can bring your project to a halt. Before you start, grab a small container or a magnetic tray to hold all the screws and internal parts as you remove them. This simple step saves you from the frustration of searching for a missing piece later. Another great trick is to take pictures with your phone at each stage of disassembly. This creates a visual guide that makes reassembly much easier, showing you exactly where every piece belongs. An organized workspace is a successful workspace, and these simple habits will save you a lot of time.
Getting the Alignment and Tightness Just Right
Proper alignment is everything when it comes to a functioning lock. When you put the lock back together, take your time to make sure all the internal parts are lined up correctly and nothing is sticking out or getting pinched. If the screw holes in the door have become stripped and worn out, don’t just force the screws back in. A better solution is to fill the holes with a bit of wood putty, let it dry completely, and then drill new pilot holes. This ensures a secure fit for the lockset. A misaligned or loose lock won’t just be hard to use; it can also damage your door, potentially leading to a need for professional door repair and installation.
Using the Correct Lubricant
It’s tempting to grab any can of oily lubricant you have lying around, but this is a major mistake for locks. Oily substances attract dust, dirt, and grime, which will eventually gum up the lock mechanism and make the problem even worse. Instead, always opt for a dry lubricant, like graphite powder. These products go on wet but dry to a fine powder that lubricates the moving parts without creating a sticky mess. Applying the right lubricant, such as white lithium grease, to all the moving components will help your lock operate smoothly and extend its lifespan significantly. It’s a small detail that makes a huge difference.
When to Call a Professional Locksmith
While tackling a home repair project yourself can be incredibly satisfying, there are times when it’s smarter to step back and call in a professional. Mortise locks, with their intricate inner workings, often fall into this category. Pushing forward with a repair that’s beyond your skill set can lead to more damage, higher costs, and a less secure door. Recognizing when you’re in over your head is key. If you find yourself stuck, frustrated, or worried about compromising your home’s security, it’s the perfect time to contact a locksmith. They have the right tools and experience to diagnose the problem quickly and get your lock working perfectly again, saving you time and giving you peace of mind.
The Damage Is More Complex Than You Thought
You started with what seemed like a simple fix, but now the lock is in pieces and the problem looks much bigger. Maybe you’ve noticed that the door itself is splintered around the lock pocket or the internal mechanism is more corroded than you expected. If you find that the door needs a lot of repair, it’s a clear sign the issue is more than a simple parts swap. Continuing could worsen the damage to both the lock and the door. A professional can assess the full scope of the problem, from the lock’s mechanism to the integrity of the door, and provide a comprehensive solution that ensures everything works smoothly and securely.
You’re Working with a High-Security Lock
High-security and antique mortise locks are not your average DIY project. These locks are built with complex mechanisms designed to resist tampering, which also makes them tricky to repair without specialized knowledge. If you have a very old or special antique lock, it’s best to call for professional help to avoid causing irreversible damage. The same goes for modern high-security locks common in commercial buildings. Our commercial locksmith team has the specific tools and expertise required to work on these intricate systems without compromising their security features, ensuring your property remains protected.
You Need the Job Done Right, and Right Now
Sometimes, you just need a working lock without the headache. If you’re struggling to take the lock apart or can’t get it back together correctly, it’s time to call for backup. A malfunctioning lock, especially on an exterior door, can be a major security risk you don’t want to leave overnight. In these situations, an emergency locksmith can solve the problem quickly and efficiently. Many common mortise lock issues can be fixed in under an hour by a professional, getting your door secured and your day back on track without the frustration of a lingering, half-finished repair project.
Related Articles
- How To Repair A Round Door Lock: A DIY Guide
- How To Fix A Broken Door Lock Step-by-Step
- How To Replace A Front Door Lock: A DIY Guide
- The Best New York Locksmith – Golden Key Locksmith NYC
- How To Choose The Best High-Security Apartment Lock
- Summer Security: Safeguarding Your Home While Away
- Building a New Home? Incorporate Security from the Start
- Student Housing Security: Staying Safe on Campus
Frequently Asked Questions
Should I repair my mortise lock or just replace it? Repairing is often a great choice, especially for older, high-quality mortise locks that were built to last. If the main lock body is still in good shape, replacing a single worn-out spring or lever can be much more cost-effective than buying a whole new lockset. However, if the lock has extensive internal damage, severe rust, or if you’re looking to upgrade your security, a full replacement might be the better long-term solution.
What’s the best lubricant to use for a sticky lock? The key is to use a dry lubricant. A product like graphite powder is perfect for the keyway and cylinder because it lubricates without attracting the dust and grime that can gum up the delicate pins. For the internal moving parts of the lock mechanism, like the latch and deadbolt, a light application of white lithium grease works well to ensure smooth operation without creating a sticky mess.
I have an old, antique mortise lock. Can I still find parts for it? Finding parts for vintage locks can be a bit of a treasure hunt, but it’s definitely possible. Specialty hardware stores, architectural salvage shops, and online suppliers are excellent resources. When you search, it helps to have the lock’s brand name or any part numbers you can find. If you hit a dead end, a professional locksmith often has access to a wider network of suppliers or can sometimes fabricate a part to get your classic lock working again.
How can I tell if the problem is the lock or the door’s alignment? A good way to check is to operate the lock with the door open. If the deadbolt and latch extend and retract smoothly when the door is open but stick or grind when it’s closed, your problem is likely alignment. This means the door has shifted and the lock components are no longer lining up correctly with the strike plate on the frame. If the lock is still stiff with the door open, the issue is inside the lock mechanism itself.
I took my lock apart and now I can’t get it back together. What should I do? First, don’t panic; it happens to the best of us. Carefully gather all the pieces so nothing gets lost and refer back to any photos you took during disassembly. If you’re still stuck, it’s best to stop and call a professional. Forcing parts together can cause permanent damage. An experienced locksmith can reassemble it correctly, ensuring it functions safely and securely.
Need professional help in NYC? Contact Golden Key Locksmith NYC for Manhattan Locksmith Services or Apartment Lockout Help. Available 24/7 across Manhattan and all NYC boroughs.