The sudden failure of an intercom buzzer often leads to one conclusion: the entire system is broken and needs to be replaced. In reality, the issue is usually much smaller and located in a single, accessible component. A single loose connection or a bit of corrosion is frequently all that stands between you and a working buzzer. This guide is your first line of defense against an unnecessary service call. We’ll explain how to fix an intercom buzzer by focusing on the most common and easily repaired problems, giving you the confidence to open up the unit and see if a simple DIY fix is all you need.
Key Takeaways
- Start with the Obvious Fixes: A silent buzzer is often caused by a simple power issue. Before you take anything apart, confirm the unit is plugged in, check your circuit breaker, and give any visible wires a quick inspection for damage.
- A Secure Connection is Key: Most DIY fixes come down to ensuring a solid electrical connection. With the power off, tighten any loose terminal screws, gently clean away corrosion from contact points, and reattach any wires that have come completely loose.
- Know When to Call for Help: Your safety is the top priority, so always turn off the power at the breaker first. If the problem involves complex wiring, is part of a larger building security system, or you simply feel out of your depth, it’s the right time to call a professional.
Why Did Your Intercom Buzzer Stop Working?
That moment of silence when you’re expecting a buzz from downstairs can be incredibly frustrating. Whether you’re waiting for a delivery, a friend, or just trying to let yourself in, a broken intercom buzzer is a major inconvenience in city life. Before you start to panic, know that the cause is usually one of a few common issues. From a simple power glitch to a worn-out button, most problems have a straightforward explanation.
Understanding why your buzzer stopped working is the first step toward fixing it. The problem could be as simple as a tripped circuit breaker or something more complex, like internal wiring that has come loose over time. In many cases, the issue stems from the daily wear and tear on the system’s components. By methodically checking for power, inspecting the wiring, and examining the physical parts, you can often pinpoint the source of the trouble. A functional intercom is a key part of your home’s security system, so let’s walk through the most likely culprits behind its sudden silence.
Check for Power Supply Problems
Before you assume the worst, let’s start with the simplest explanation: a power issue. Like any electronic device, your intercom needs a steady supply of electricity to function. A power surge, a tripped breaker, or even a loose plug could be all that’s standing between you and a working buzzer. If your system is battery-operated, the fix could be as easy as swapping in a fresh set. Intermittent problems, where the buzzer works one minute and not the next, often point to a power supply issue. It’s always a good idea to check for loose power cables or signs of battery wear before moving on to more complex troubleshooting steps.
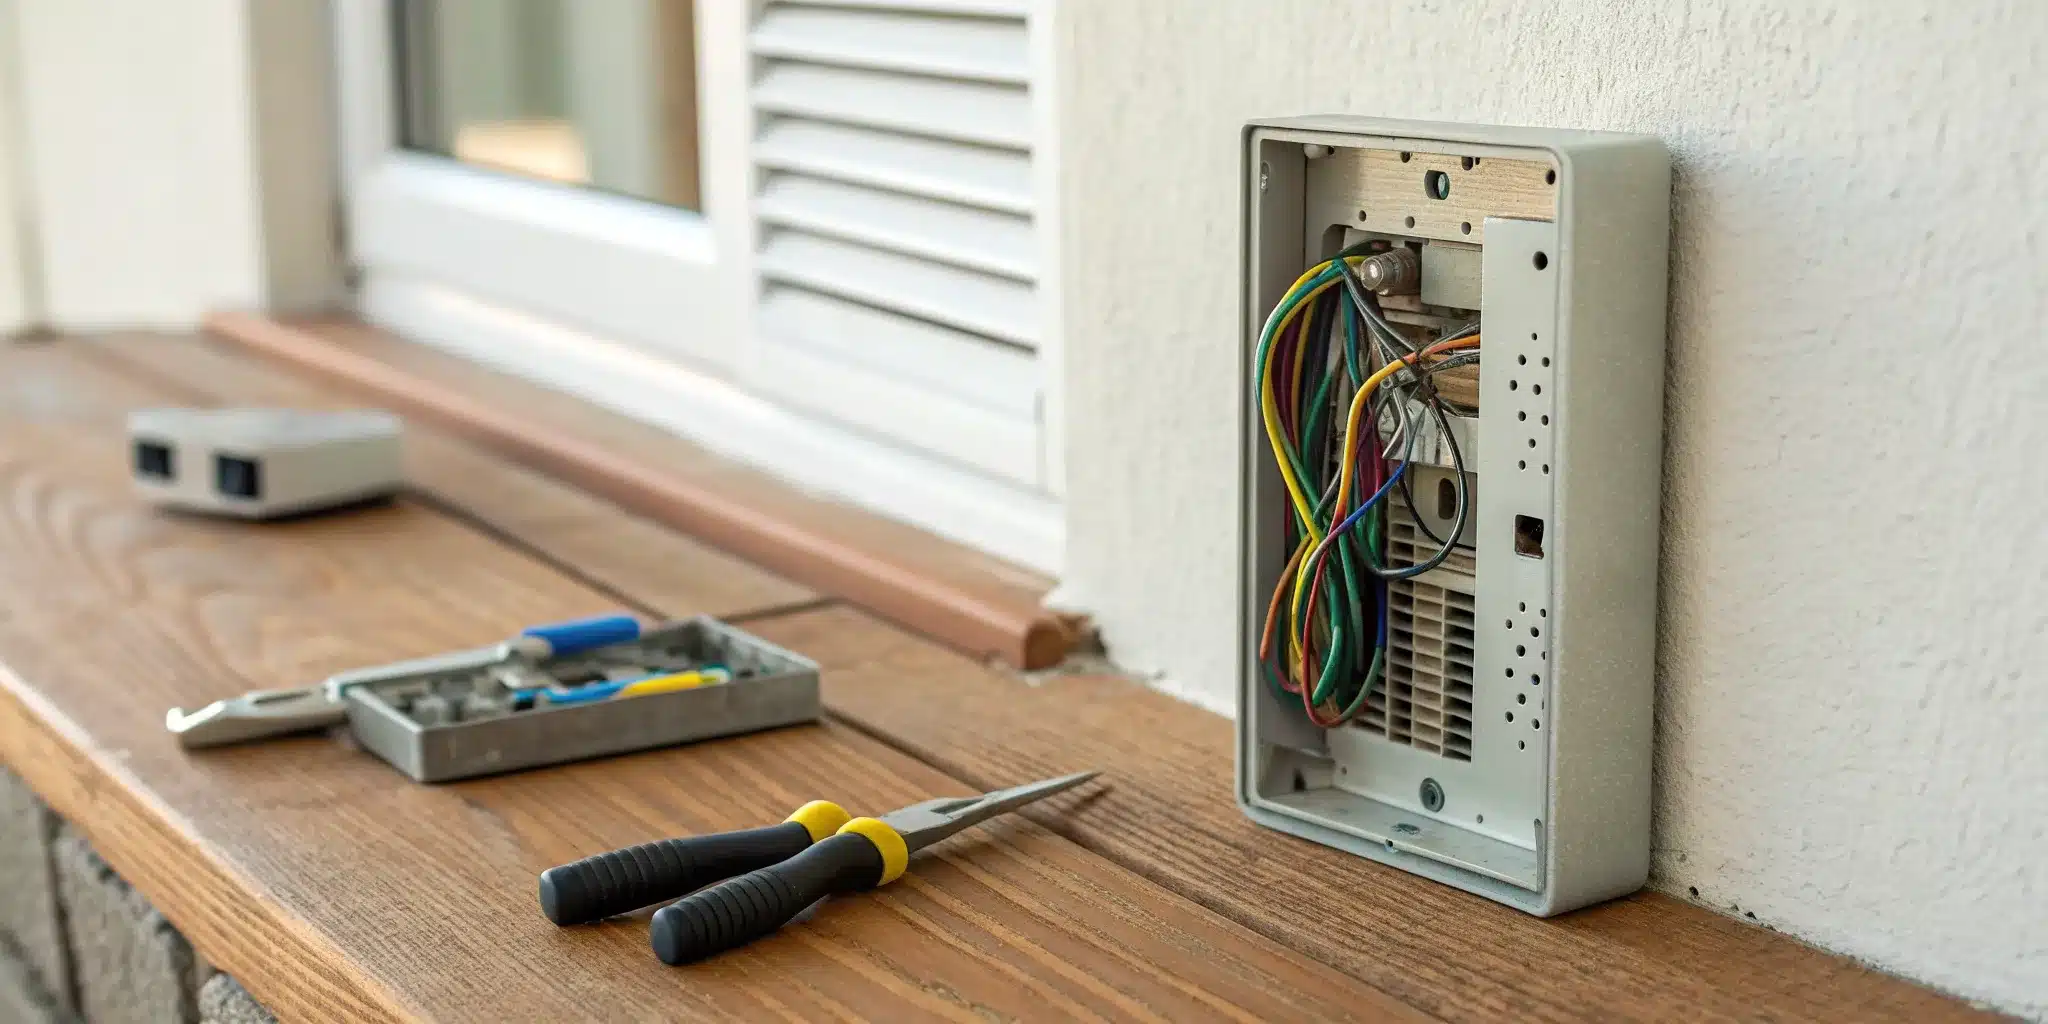
Look for Faulty Wiring
If the power supply seems fine, the next place to look is the wiring. Over time, especially in older buildings, wires can become frayed, disconnected, or corroded. Loose or damaged connections are a frequent cause of intercom system problems. A single disconnected wire can prevent the buzzer from receiving the signal to sound. You might notice other issues too, like crackling audio or a door release that doesn’t work. These are all signs that the wiring needs attention. While some wiring is visible and easy to inspect, much of it is hidden within the walls, which can make diagnosis a bit trickier.
Identify Failing Components
Your intercom system is made up of several physical parts that get used every day, and eventually, they can wear out. The first culprit of a faulty buzzer is often the button itself. Think about how many times it gets pressed—it’s bound to fail at some point. Inspect the button on the exterior unit for any obvious signs of wear, like being stuck or loose. Other components, such as the speaker, the transformer that powers the buzzer, or the buzzer mechanism itself, can also fail. A careful visual inspection can sometimes reveal the part that needs to be repaired or replaced.
Consider Environmental Damage
For intercoms with components exposed to the outdoors, the weather can be a formidable foe. Rain, snow, humidity, and extreme temperatures all take a toll. If your buzzer is open to the elements, it may suffer from wear and tear that affects its functionality. Water can seep into the unit, causing short circuits or corrosion on the electrical contacts. Dust and debris can also accumulate and jam the button mechanism. This kind of environmental damage can cause the system to fail gradually or all at once, making it a key factor to consider when your buzzer goes silent.
A Step-by-Step Guide to Troubleshooting Your Intercom
When your intercom goes silent, it’s easy to assume the worst—and picture a hefty repair bill. But before you panic, let’s walk through a few simple troubleshooting steps. More often than not, the culprit is a minor issue you can fix yourself in just a few minutes. The key is to work methodically, starting with the most common and easiest-to-solve problems first. By checking the power, inspecting the wiring, and running a few simple tests, you can diagnose what’s going on with your system.
This guide will take you through the initial diagnostic process, helping you rule out the simple stuff. We’ll cover everything from checking the power source and circuit breaker to inspecting visible wires for damage. We’ll even touch on how to safely use a voltage meter if you’re comfortable with basic electronics. Think of this as your first line of defense. Following these steps will either get your buzzer working again or give you a much clearer idea of the problem, which is valuable information if you end up needing to call in a pro.
Start by Checking the Power Source
Before you start taking things apart, let’s begin with the most fundamental question: is the intercom getting power? It sounds obvious, but you’d be surprised how often this is the root of the problem. First, check the main unit to see if it’s plugged in securely. Look for any indicator lights that show it’s receiving power. If your system powers off unexpectedly or seems to work only sometimes, it could be due to loose power cables or battery wear. Some wireless or standalone units run on batteries, so if yours is one of them, try replacing them with a fresh set. This simple step can save you a lot of time and unnecessary troubleshooting.
Test the Circuit Breaker
If the outlet seems dead and there are no signs of life from the intercom, your next stop should be the circuit breaker box. Intercom systems are often wired into your property’s main electrical panel. Find your breaker box—usually located in a basement, garage, or utility closet—and open the cover. Look for a switch that is in the “off” position or stuck in the middle. If you find one, flip it firmly to the “off” position and then back to “on” to reset it. If the breaker trips again immediately, that signals a deeper electrical issue, and it’s best to leave it alone and consult a professional.
Inspect All Visible Wiring
Faulty wiring is another common cause of intercom failure. Take a few moments to visually inspect all the wires you can see running to and from the intercom units. You’re looking for anything that seems out of place. Check for loose connections, frayed insulation, or wires that have been pinched or broken. Sometimes, a wire can simply wiggle loose from its terminal over time. Loose or damaged connections often lead to intercom system problems that can be easily fixed. If you find a loose wire, tightening the connection might be all it takes. This is especially important for older security systems that have seen years of use.
How to Safely Use a Voltage Meter
If you’ve checked the basics and are comfortable taking the next step, a voltage meter (or multimeter) is a great tool for confirming whether power is reaching the unit. First, set your meter to the appropriate voltage setting (AC or DC, depending on your system). Carefully touch the meter’s probes to the power terminals on your intercom unit. If you get a reading that matches your system’s requirements (check the manual), you know power isn’t the issue. If you get no reading, the problem lies somewhere between the breaker and the unit. Always prioritize safety—if you’re unsure or uneasy about working with electrical currents, this is the perfect time to call a professional.
Common Wiring Issues to Look For
After you’ve confirmed the power is on, the next place to investigate is the wiring. More often than not, a silent buzzer is the result of a simple wiring problem. Over time, wires can loosen, fray, or corrode, interrupting the electrical signal that makes your buzzer ring. It’s especially common in older apartment buildings where the wiring has seen years of use. Before you assume the entire unit is broken, take a few minutes to inspect the connections. A careful look can often reveal the root of the problem, saving you time and money.
Identifying the specific issue is the key to a successful fix. We’ll walk through the four most common culprits: loose connections, missing wires, physical damage, and corrosion. While many of these are straightforward DIY fixes, remember that complex or widespread wiring issues are best handled by a professional who understands modern security systems and can ensure everything is up to code.
Loose Connections
Think of it like a lamp that flickers because the plug isn’t all the way in the outlet—the same principle applies here. The daily vibrations from doors closing, foot traffic, or even temperature changes can cause the tiny screws holding the intercom wires to loosen over time. When a wire isn’t making solid contact with its terminal, the electrical circuit is broken, and your buzzer won’t work. This is one of the most frequent and easily fixed intercom problems. With the power off, gently tug on each wire connected to the buzzer unit. If you find one that’s wobbly or pulls out easily, you’ve likely found your problem.
Missing Wires at the Buzzer
For your buzzer to make a sound, it needs a complete electrical path, or circuit. This requires two wires to be connected to it. It’s surprisingly common to find that one of these wires has detached completely, especially if the initial installation wasn’t perfect. If you open your intercom unit and see a terminal with a screw but no wire, look around inside the housing. You’ll probably find the missing wire hanging loose nearby. A buzzer with only one wire connected simply can’t work, so re-establishing that second connection is essential to getting it ringing again.
Damaged or Frayed Wires
Your intercom’s wiring can take a beating, particularly the parts exposed to the elements near your front door. Constant exposure to moisture, sun, and temperature swings can cause the protective plastic insulation to crack, peel, or become brittle. This can lead to frayed or broken wires. You should also check for any signs of pinching from a door or damage from pests. Carefully inspect the visible length of the wiring for any wear and tear. A damaged wire not only stops your buzzer from working but can also be a safety risk, so it’s a problem you’ll want to address right away.
Corroded Terminals
If you look at the metal points where the wires connect and see a crusty, greenish, or rusty buildup, you’re looking at corrosion. This happens when moisture and air react with the metal terminals, creating a layer that blocks the flow of electricity. It’s a common issue in humid climates or in systems exposed to the NYC weather. Even if the wires are tight, this corrosive barrier can prevent a solid connection. Luckily, it’s often an easy fix. Cleaning this buildup off the terminals can restore the electrical contact and bring your buzzer back to life.
Gather Your Tools and Materials
Before you start taking things apart, let’s make sure you have everything you need. Just like any project, having the right tools and materials on hand makes the job go smoother and, more importantly, safer. A quick trip to the hardware store now can save you a lot of frustration later. Think of it as setting up your workspace for success. We’ll break it down into three categories: tools for figuring out the problem, materials for the actual fix, and the safety gear you absolutely shouldn’t skip.
Tools for Diagnosis
To figure out what’s wrong with your intercom buzzer, you’ll need a couple of key items. The most important tool in your diagnostic kit will be a voltage meter, also known as a multimeter. This device is essential for checking for power issues, which are a common culprit. It will help you safely determine if electricity is flowing correctly through the system. You don’t need a top-of-the-line model; a basic one that can read AC and DC voltage will do the trick. Having a set of screwdrivers (both flathead and Phillips) and a wire stripper will also be incredibly helpful for getting a closer look at the internal components and wiring.
Materials for the Fix
Once you’ve pinpointed the problem, you’ll need the right parts to get it working again. The exact materials will depend on your diagnosis, but it’s good to be prepared. You might need some replacement wiring, wire connectors, or even a brand-new buzzer unit if the old one is beyond repair. Take a close look at your current setup for any signs of wear and tear, especially if it’s exposed to the weather. Sometimes, a faulty intercom is connected to broader issues with the entryway itself. If the problem seems bigger than just the buzzer, you may need professional door repair and installation to get everything secure and working properly.
Essential Safety Gear
This is the most important part—please don’t overlook it. Working with any kind of electrical system, even a low-voltage one like an intercom, requires caution. At a minimum, you should have a pair of insulated gloves to protect your hands and safety goggles to shield your eyes from any debris or sparks. A voltage tester is also a must-have to double-check that the power is completely off before you touch any wires. If you feel unsure at any point or if the wiring looks more complex than you expected, it’s always best to stop and call a professional. Your safety is worth more than a quick DIY fix.
Safety First: Key Precautions to Take
Before you even think about touching a wire, let’s talk about safety. Working with any kind of electrical system, including your intercom, requires a healthy dose of caution. These aren’t suggestions—they’re essential steps to protect you from injury and prevent further damage to your system. Taking a few minutes to prepare properly can make the difference between a successful fix and a dangerous mistake. If you ever feel unsure about what you’re doing, especially when it comes to your building’s wiring, it’s always best to pause and call a professional. Your safety is the top priority.
Always Disconnect the Power
This is the most important rule of any electrical repair: always turn off the power at the source. Before you start, locate the circuit breaker that controls your intercom system and switch it off. This simple action is your best defense against accidental electrical shocks while you work. If you’re not sure which breaker it is, it’s better to turn off the main power to your apartment or office. Confirm the power is off by trying to use the intercom before you open it up. If you can’t confidently locate the right breaker or feel uneasy about it, our emergency locksmith team can handle electrical systems safely.
Use Insulated Tools
When you’re working with wiring, the right tools are non-negotiable. Insulated tools have rubber or plastic handles that don’t conduct electricity, providing a critical layer of protection. Using standard metal screwdrivers or pliers on an electrical device is a serious risk. Even with the power disconnected, there can sometimes be residual charge in the system. Insulated tools help ensure you can safely handle any exposed wires or connections without the risk of shock. Think of them as essential safety gear, just as important as anything else in your toolbox. This precaution is vital for your personal safety and the integrity of your intercom.
Work in a Dry Area
Water and electricity are a dangerous combination. Before you begin, make sure the area around the intercom unit—and your hands—are completely dry. Moisture can cause short circuits, damage the delicate internal components of your intercom, and create a serious shock hazard. If your intercom is located in an area exposed to the elements, like an outdoor entryway, check for any signs of water damage or condensation inside the unit. This is a common cause of malfunctioning buzzers. Keeping your entire work area dry is a simple but crucial step for both a successful repair and your own well-being, especially for complex security systems that integrate with your intercom.
How to Properly Test Your Intercom System
Before you can fix the problem, you need to know exactly what you’re dealing with. Properly testing your intercom system is a process of elimination that helps you pinpoint the source of the issue. By systematically checking each component, from the power source to the final sound output, you can avoid unnecessary work and focus your efforts where they’re needed most. This diagnostic phase is the most important part of any DIY repair. Grab your tools, and let’s walk through how to test your system safely and effectively.
Test the Transformer’s Output
The transformer is what converts your home’s standard voltage into the low voltage your intercom needs to operate. If it’s not working correctly, nothing else will. Start by checking the power supply and the circuit breaker connected to the intercom system to make sure power is flowing. If the breaker hasn’t tripped, take a close look at the transformer itself. Inspect all the wiring connections attached to it. Are any of them loose? If so, tighten them securely. You should also look for any wires that appear damaged or frayed. A faulty transformer is a common culprit, and confirming it’s receiving and sending power is your first critical diagnostic step.
Check the Voltage at the Buzzer
Once you’ve confirmed the transformer has power, the next step is to see if that power is reaching the buzzer unit. This is where a voltage meter (or multimeter) comes in handy. Set your meter to the appropriate AC or DC voltage setting based on your intercom’s specifications. Carefully touch the meter’s probes to the two terminals on the buzzer unit where the wires connect. You’re looking for a voltage reading that matches what your system’s manual specifies. If you get a correct reading, you know the wiring to the buzzer is likely fine. If you get no reading or a very low one, it points to a problem in the wiring between the transformer and the buzzer.
Verify the Door Release Works
Many intercom systems are connected to a door release mechanism, and sometimes the issue lies with this function rather than the buzzer itself. Have a friend press the button on the main intercom panel while you stand at the door. Do you hear the tell-tale click or buzz of the lock releasing? If not, the problem could be with the door strike or a specific component called a bell transformer. This part can fail over time and may need to be replaced. Testing and replacing these components can be tricky, so if you suspect an issue with the door release, it might be time to call in a professional for your building’s security systems.
Test the Sound Quality and Volume
If the buzzer works but sounds off—maybe it’s crackling, faint, or has a constant hum—the issue is likely with the audio components or their connections. Poor sound quality is often caused by interference or a weak signal. Start by checking that all audio cables and connections are tight and secure, both at the main unit and at your apartment’s station. A loose wire is a frequent cause of signal loss. Also, inspect the speaker on your unit for any visible damage or debris that could be muffling the sound. Cleaning the speaker grille and tightening all connections can often resolve common audio problems without needing to replace any parts.
Simple DIY Intercom Buzzer Repairs
Once you’ve pinpointed the likely cause of your silent buzzer, you might be surprised to find the fix is well within your reach. Many common intercom issues stem from simple wear and tear that you can address with a few basic tools and a little patience. Before you assume the entire system needs replacing, try these straightforward repairs. These steps cover the most frequent culprits, from loose wires to dirty contacts. If you work through these and still have trouble, it might signal a deeper problem with your building’s security systems, but often, one of these simple fixes will get your buzzer working again.
Tighten Loose Connections
Over time, vibrations from daily use and opening or closing doors can cause wires to loosen from their terminals. A loose connection is one of the most common reasons an intercom buzzer stops working, and thankfully, it’s also one of the easiest to fix. After turning off the power, open your intercom unit and visually inspect each wire connected to a screw terminal. Gently tug on each one to see if it’s loose. If you find a culprit, simply use a small screwdriver to tighten the screw until the wire is held firmly in place. This simple step can restore the electrical circuit and bring your buzzer back to life.
Replace Damaged Wires
Wires can become brittle, frayed, or even break over time, especially if they are exposed or bent repeatedly. Start by carefully inspecting the wiring leading to the buzzer. Look for any visible signs of damage, like cracked insulation or exposed copper. If you find a damaged section, you can often repair it without replacing the entire wire. After cutting the power, use wire cutters to snip out the damaged portion. Then, use wire strippers to expose about half an inch of fresh wire on both ends and securely reconnect them using a wire nut or by re-attaching them to the terminals.
Clean Corroded Contacts
Your intercom’s buttons and wire terminals are exposed to dust, moisture, and grime, which can lead to corrosion. This buildup can prevent a solid electrical connection, making your buzzer unresponsive. A quick cleaning is a great low-tech fix to try. With the power disconnected, dip a cotton swab or a small, soft brush in rubbing alcohol and gently scrub the metal contact points on the buttons and the screw terminals where the wires connect. This can dissolve the grime and corrosion, restoring a clean connection. Make sure the alcohol has fully evaporated before you turn the power back on.
Reconnect Missing Wires
Sometimes a wire doesn’t just come loose—it disconnects from its terminal completely. When you open your intercom unit, you might see a wire just hanging free. Your job is to play detective and figure out where it belongs. Look for an empty screw terminal near the other wires. Most buzzers require two wires to complete the circuit, so if you only see one attached, the stray wire is likely its partner. Loosen the corresponding screw, loop the end of the wire around it in a clockwise direction, and tighten the screw down firmly to secure it.
Common Mistakes to Avoid
Even the most confident DIY-er can hit a snag. When it comes to fixing your intercom buzzer, a few common missteps can turn a simple repair into a major headache. Knowing what not to do is just as important as knowing the right steps to take. Let’s walk through the most frequent mistakes so you can get the job done right the first time and avoid any frustrating setbacks or safety risks. By sidestepping these common errors, you’ll be much closer to a successful repair and a buzzer that works exactly as it should.
Never Work on a Live System
This is the number one rule of any electrical work, and it’s non-negotiable. Before you even think about touching a wire or opening up the unit, you must ensure the power is turned off. Working on a live system puts you at serious risk of electrical shock and can cause short circuits that do even more damage to the intercom. Head to your circuit breaker and flip the switch that controls the intercom system. If you’re not sure which one it is, it’s always safest to turn off the main power. This simple step is the most important one you’ll take for your personal safety and the integrity of your home’s electrical system.
Using the Wrong Tools or Materials
It can be tempting to grab whatever screwdriver is handy or use a bit of all-purpose tape for a quick fix, but this is where many DIY repairs go wrong. Using inappropriate tools or materials can lead to improper repairs and may cause additional damage to the intercom system. A pair of pliers isn’t a substitute for a proper wire stripper, and using the wrong gauge of wire can create a fire hazard. Having the right gear, like a multimeter for accurate diagnosis and insulated screwdrivers for safety, isn’t just for professionals. It ensures your connections are secure and your fix is reliable, preventing you from creating new problems while trying to solve the original one.
Ignoring Proper Wiring
Your intercom’s wiring is its central nervous system, and overlooking it is a classic mistake. Often, the root of the problem isn’t a broken component but a simple wiring issue. Loose or damaged connections are a frequent cause of intercom system problems that can otherwise be easily fixed. Don’t just give the wires a quick glance. You need to inspect them closely for signs of corrosion, fraying, or breaks. Gently tug on each connection to make sure it’s secure. Ignoring a small wiring issue can mean your fix won’t last, leading to more frustration down the road. Properly installed wiring is fundamental to all modern security systems, and your intercom is no exception.
Know When to Call a Professional
While tackling a DIY project can be incredibly satisfying, it’s just as important to know when to put the tools down and call for backup. If you’ve tried the basic troubleshooting steps and your intercom buzzer is still silent, or if you feel like you’re getting in over your head, it’s probably time to contact a professional. Attempting a complex repair without the right expertise can turn a small problem into a much bigger, more expensive one. Your safety and the proper functioning of your building’s security are what matter most, and sometimes that means letting an expert take the lead. A professional can diagnose the issue quickly and ensure the job is done right, giving you peace of mind.
If You Have a Complex System
If your intercom is part of a larger, more sophisticated setup, it’s best to leave the repairs to a technician. Many modern buildings in NYC use integrated security systems that connect intercoms with cameras, electronic locks, and access control panels. These systems have intricate wiring and configurations that require specialized knowledge. Trying to fix one component on your own can accidentally disrupt another, potentially compromising your building’s security. If you open the panel and see a web of wires you can’t make sense of, that’s your cue to call a professional who understands these complex systems.
For Building Code Compliance
Living in an apartment or condo building means your intercom is likely part of a unified system that serves every unit. In most cases, your landlord or building association is responsible for these repairs. You typically can’t replace your buzzer with a different model because it needs to be compatible with the entire building’s setup. Before you attempt any major fixes, check your lease or contact your building management. They can clarify who is responsible for the repair and ensure any work done complies with building codes. If you need assistance, a technician who provides professional residential services can work with you and your building management to find a solution.
When Safety Is a Concern
Your safety should always be the top priority. If troubleshooting your intercom involves hidden wires, cutting into walls, or dealing with any signs of electrical damage like frayed cables or burn marks, stop immediately. These are clear indicators that the job requires an expert. Working with electricity is dangerous without the proper training and tools. A professional has the equipment to handle these situations safely, preventing personal injury and further damage to your property. If you’re ever unsure or feel unsafe, calling an emergency locksmith is the smartest and safest choice you can make.
Preventing Future Intercom Problems
After you’ve gone through the trouble of fixing your intercom, you’ll want to make sure it stays that way. A little preventative care can save you a lot of future headaches and keep your system working reliably. Think of it like changing the oil in your car—a small, regular effort that prevents bigger, more expensive problems down the road. By paying attention to maintenance, protecting your hardware, and using the system correctly, you can extend its lifespan and maintain a secure entry point for your home or building.
Schedule Regular Maintenance
Setting aside time for a quick check-up every few months is one of the best things you can do for your intercom. You don’t need to be an expert to spot early warning signs. Regularly check your system for issues like static, buzzing sounds, or poor audio quality to catch problems before they get worse. Make a simple mental checklist: Does the audio sound clear on both ends? Does the door release button work every time? A proactive approach helps ensure your system remains a reliable part of your building’s security. If you notice recurring issues during your checks, it might be time to call in a professional for a more thorough inspection of your security systems.
Protect Your System from the Elements
Your intercom’s outdoor unit faces a tough job, especially in New York City. It’s exposed to everything from summer humidity to winter snow. The buzzer button is often the first component to fail due to wear and tear from the elements. Take a close look at the exterior panel. Are there any cracks in the casing where water could seep in? Is the button sticking or worn down? If your unit is particularly exposed, consider installing a small protective cover or shield over it. This simple addition can significantly reduce damage from rain and direct sunlight, helping your system last much longer. Proper door repair and installation can also ensure the entire entry point is sealed and secure.
Follow Proper Usage Guidelines
How you and others use the intercom every day has a big impact on its longevity. Encourage everyone in your household or building to handle the equipment with care. This means avoiding slamming the handset down, pressing buttons with excessive force, or yanking on wires. If you’re a building manager, providing simple usage instructions to new tenants can prevent misuse and unnecessary service calls. When residents and management work together to use the system properly, it reduces wear and tear and keeps everything functioning smoothly. If your system seems to be failing despite gentle use, it might be a sign that it’s outdated and needs a professional assessment from a residential locksmith.
Related Articles
- Apartment Intercom Phone: A Complete Buyer’s Guide
- How To Find The Best Company For Intercom Repair
- Locksmith Services
Frequently Asked Questions
What’s the absolute first thing I should do if my intercom buzzer isn’t working? Start with the simplest explanation: power. Before you even grab a screwdriver, head to your circuit breaker box. Look for a tripped switch and try resetting it. If that doesn’t solve it, make sure the main unit is securely plugged in and check for any indicator lights. It sounds almost too basic, but you’d be surprised how often a simple power issue is the culprit, saving you a lot of unnecessary troubleshooting.
Is it really safe for me to try fixing my intercom myself? For simple issues like tightening a loose wire or cleaning a dirty terminal, it’s generally safe as long as you take one crucial step: always turn off the power at the circuit breaker first. However, if you see frayed wires, signs of water damage, or feel at all unsure about what you’re looking at, it’s time to stop. Your safety is the priority, and a professional can handle complex or risky situations without any guesswork.
My buzzer makes a sound, but it’s faint or crackly. Is that a wiring problem? It certainly could be. Poor sound quality often points to a weak or interrupted signal, which can be caused by a loose connection or a corroded terminal. It could also be an issue with the speaker itself, perhaps from dust or debris. Start by checking and tightening all the visible audio connections. If that doesn’t clear things up, the problem might be with an internal component that needs a closer look.
How can I tell if the problem is just with my apartment’s unit or the entire building’s system? This is a great question for anyone in a multi-unit building. The easiest way to check is to ask a neighbor if their buzzer is working. If theirs is also out, it’s almost certainly a building-wide issue that your landlord or property manager needs to handle. If your neighbor’s system is working fine, the problem is isolated to your unit or the wiring leading to it, which means you can proceed with your own troubleshooting.
I’ve tried tightening wires and checking the power, but nothing has worked. What’s my next move? You’ve done your due diligence, and that’s great! Knowing when to call for help is just as important as knowing how to use a screwdriver. If the basic fixes haven’t solved the problem, it’s time to contact a professional. The issue is likely more complex, such as a failed transformer or a problem hidden within the walls. A technician has the right tools and expertise to diagnose and fix it safely and correctly.
Need professional help in NYC? Contact Golden Key Locksmith NYC for Commercial Door Repair or Metal Door Repair. Available 24/7 across Manhattan and all NYC boroughs.